In this article, we are going deeper into Kubernetes Network and exploring some of the best alternatives to create your home lab cluster. This is not a beginner article; most people don’t need to go that far with Kubernetes Cluster to learn and make a useful environment.
Although, if you are like me that want your Kubernetes cluster at home working as close as possible to a real environment, with everything responding to your local domain names and running with valid certificates, this article is for you.
One of the best ways to secure your home lab Kubernetes Cluster is to use a combination of Load Balancer, ingress controller, certificates management, and an official certificate issuer. We will use Traefik, Cert-manager, and Let’s Encrypt here to create a perfect solution for your home lab. We will also use Cloudflare DNS to help with this task. Besides the best solution for your home lab k8s cluster network you can get, you will also learn a lot in the process. So, roll up your sleeves, and let’s get started.
What do I need to start?
The Kubernetes Cluster
You will need a working version of the Kubernetes Cluster. If you don’t have one, follow this tutorial: How to install Kubernetes: The Definitive Guide and create your own, similar to the one I’m using in this lab. Although, any Kubernetes solution will work here. I recommend not using desktop solutions like Kind(K8s in Docker), Minikube, or Docker Desktop (k8s enabled).
You are trying to make your cluster as close to production as possible; if you do not have a server or any spare hardware, create virtual machines on your own computer. To create it, you can use VirtualBox, VMWare, or even Windows Hyper-V.
Load Balancer
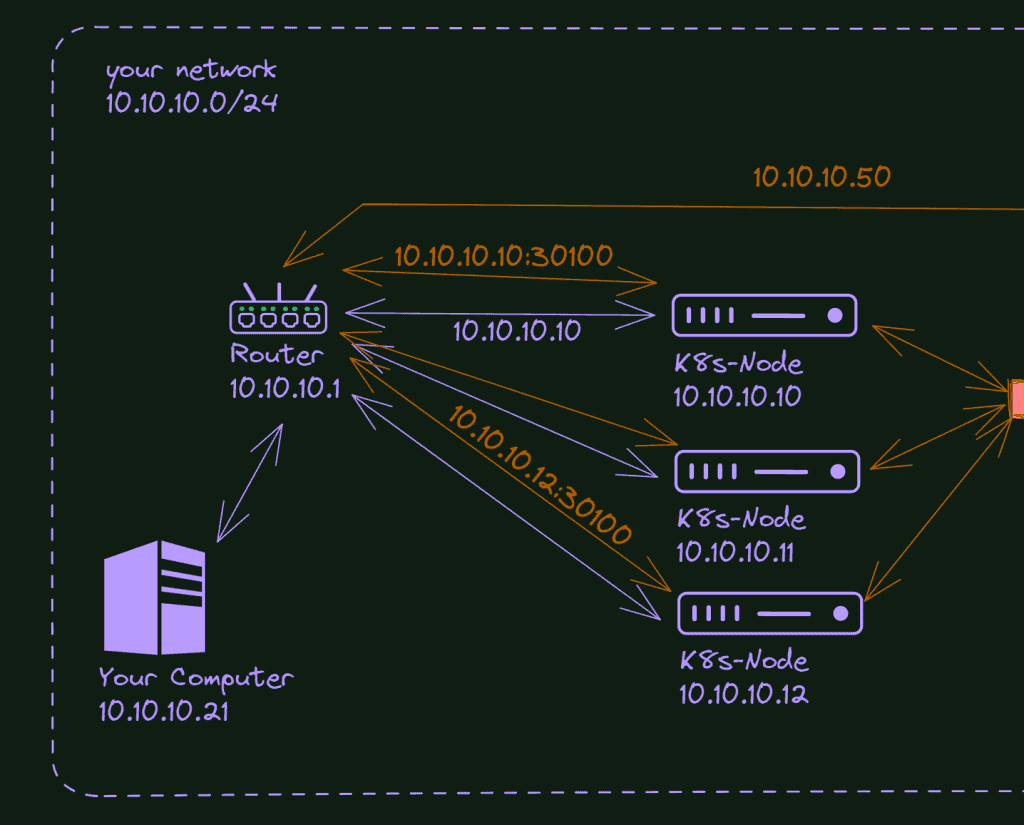
You will also need a load balancer installed. I created a detailed article about that, and although this is not part of a series, you can start with it: How to access your K8s cluster apps: K8s’ network 101. If you already know how to configure a load balancer and want to skip it, that’s fine too. I’m using Metal LB for this tutorial, and we will install Traefik Ingress Controller on top of it.
The Domain name
You will also need a domain name and a free Cloudflare account. We will not expose the cluster to the internet, but we need a way to validate the ownership of the domain to generate real certificates for our cluster. The strategy will be to create a subdomain for your local environment.
Any domain will work; if you do not have one, you can buy some cheap ones at Namecheap.
You will also need a free account at Cloudflare; we will use their DNS service to validate the ownership of our domain and be able to generate valid certificates for our cluster.
How to install and configure traefik to work on this scenario?
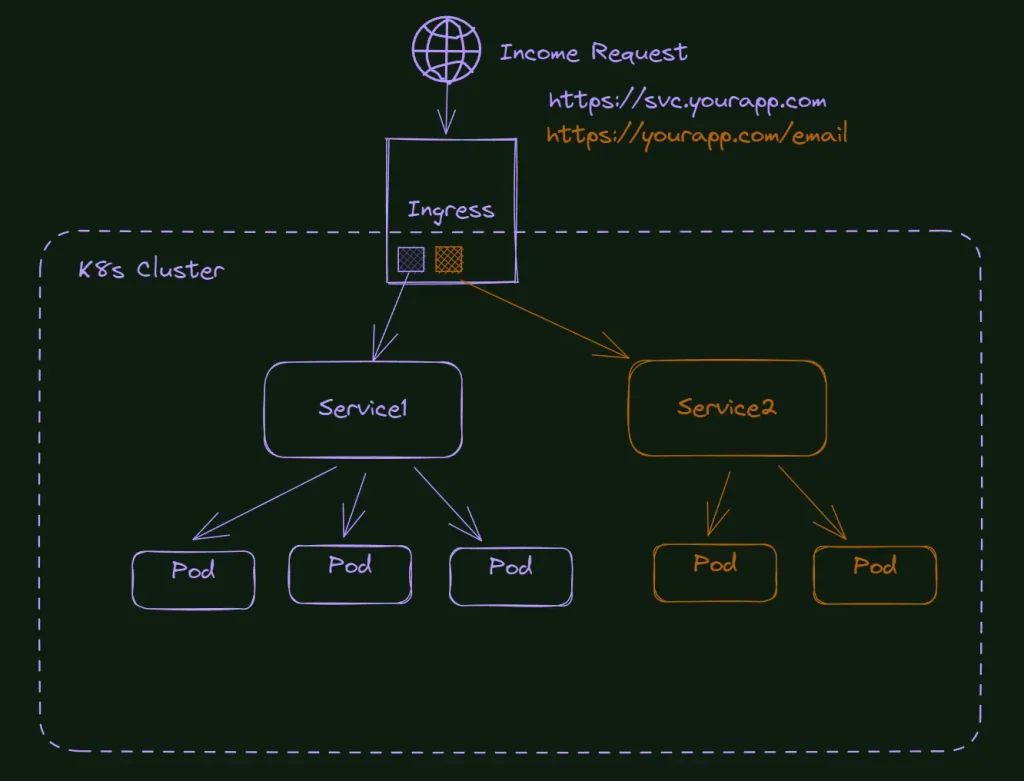
At this point, we already have a cluster running and the metallb working in our system. The next step is to take care of Traefik, our ingress controller. It will be responsible not only for redirecting the traffic according to the HTTP headers but also for the TLS configurations of the site.
Note: All files you see here are publicly available in my GitHub profile (https://github.com/fabiofernandesx/K8sManagingSSL)
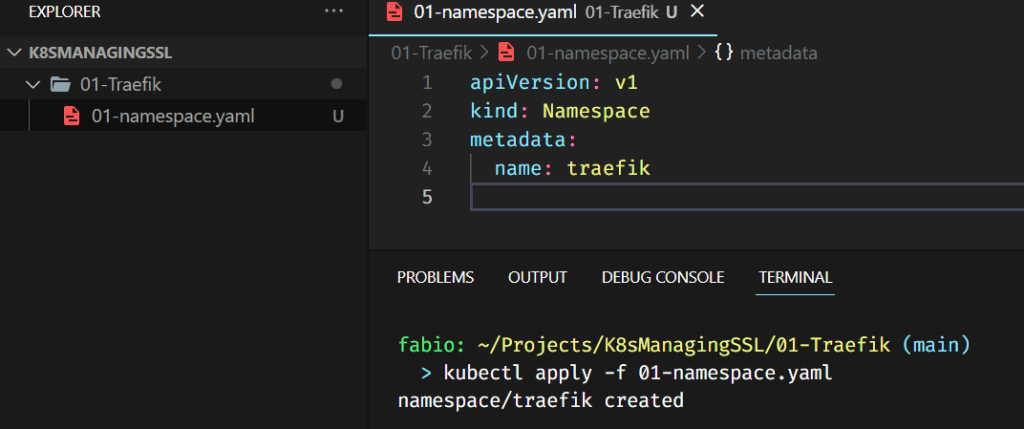
Ok, let’s proceed, starting with the namespace creation:
If you do not have the helm repository for Traefik already saved in your system, add it with the command:
helm repo add traefik https://helm.traefik.io/traefik
Before we install the traefik, we need to create a file with parameters to guide this installation. On my repository, you can find the file values.yaml. This is the file that we will use to customize the traefik installation.
helm install –namespace=traefik traefik traefik/traefik –values=02-values.yaml
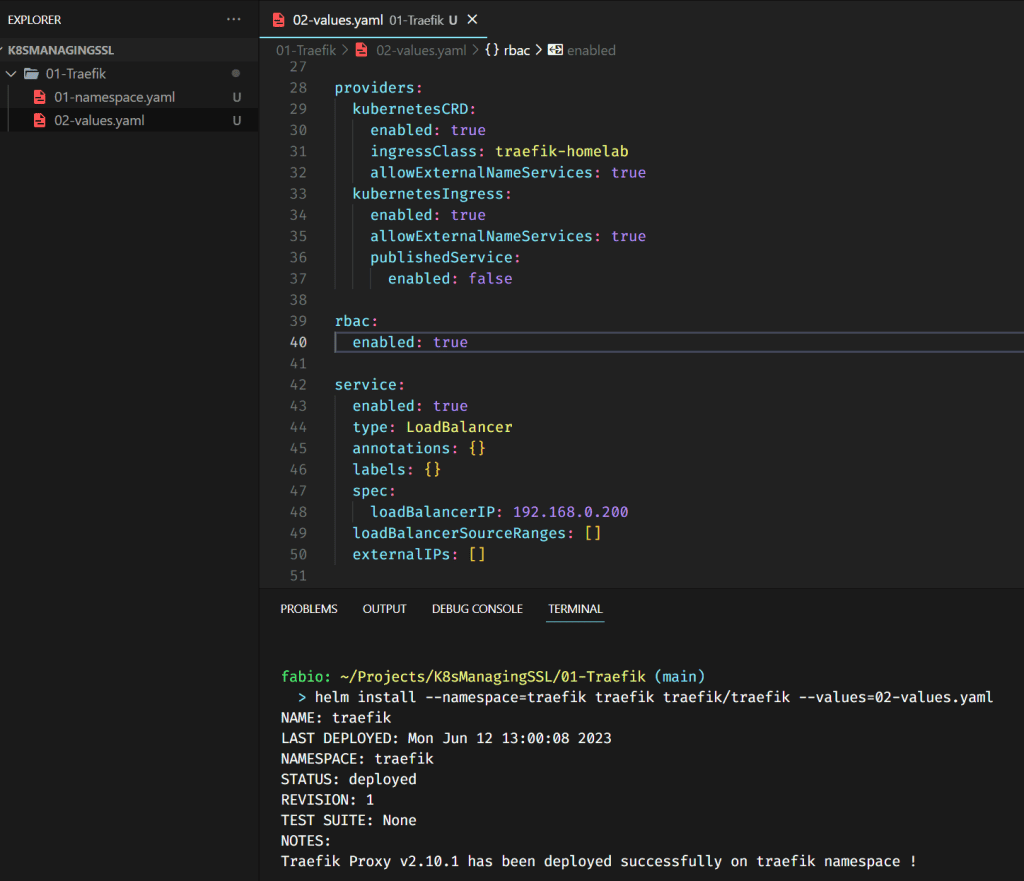
I will not pass through all the parameters here, you can check each one of these values with long explanations in the traefik documentation, but there are 2 important values I want to mention. The first one is the ingresssClass. We will use this class later, and it’s important to give it a name we can remember. Any name here works.
Also, the loadBalancerIP is the traefik IP that we will send our traffic to. If you have a local DNS server, you need to point the domain you choose to represent your home lab to this IP. This is not the IP from metallb but must be in the range of IPs we configured there. In my example, I just got the first available IP from metallb to use in traefik.
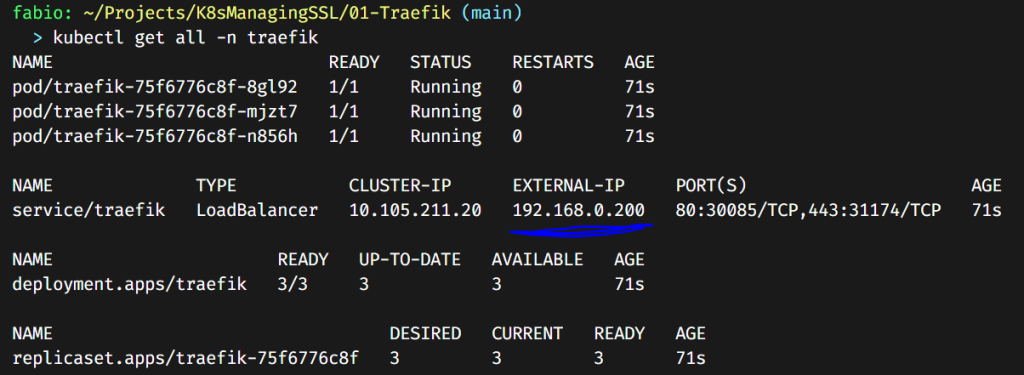
As you can see in the picture, the traefik service is running and correctly received the IP we configured from metallb. So far, so good. If yours didn’t receive the IP, check your configurations. Check if your metallb is running and if the IP you set to traefik is inside the range of IPs you configured in the metallb.
Optional Headers Definitions
We are talking about HTTP headers management and requests forward with Traefik Ingress. Since this service is essentially a proxy, we can configure it to add custom headers to our HTTP requests for several reasons. Some of these headers can be used to improve security; others are necessary for the applications you are installing, and so on. I will not enter too many details here, but I will show how you can create a traefik middleware to do that. You can customize it as you like or according to the requirements of your application.
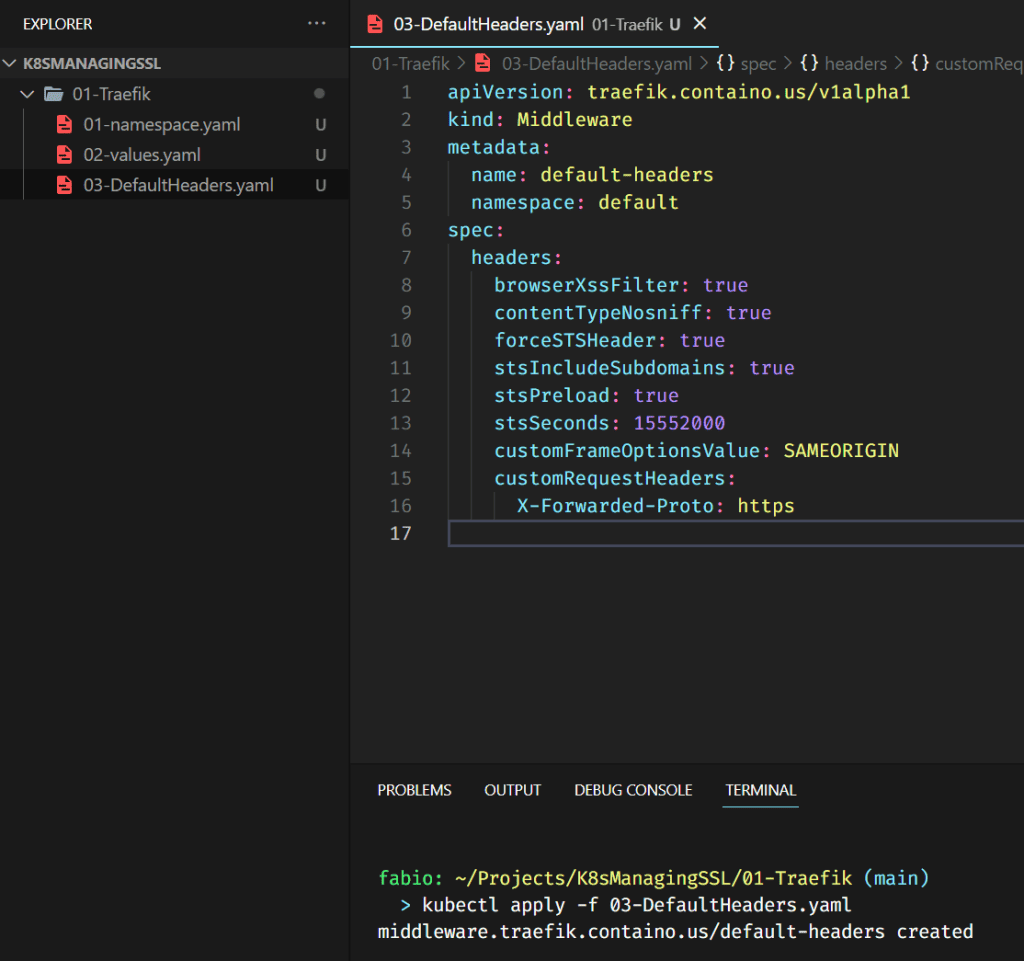
Here we are just creating the middleware resource into our cluster, but if you already had to change these headers before, maybe after a PENTEST session, you can see how cool it is with traefik.
DNS plan and configurations
We need some definitions here. What will be your local domain? What is the domain for your applications? In my case, I decided to use an old domain that I’m not using anymore in production and it’s good because it’s short enough to put some levels of subdomains in it.
The domain is: ff1.dev, and the plan is to create something like *.home.ff1.dev then I can generate a wildcard certificate and put all my apps to follow this pattern. So, the traefik dashboard could be traefik.home.ff1.dev, that sounds cool, right?
We need to configure some internal DNS to point to the domain *.home.ff1.dev and the IP of the traefik load balancer. As domain servers are out of scope for this tutorial, for now, let’s configure some entries into our hosts file.
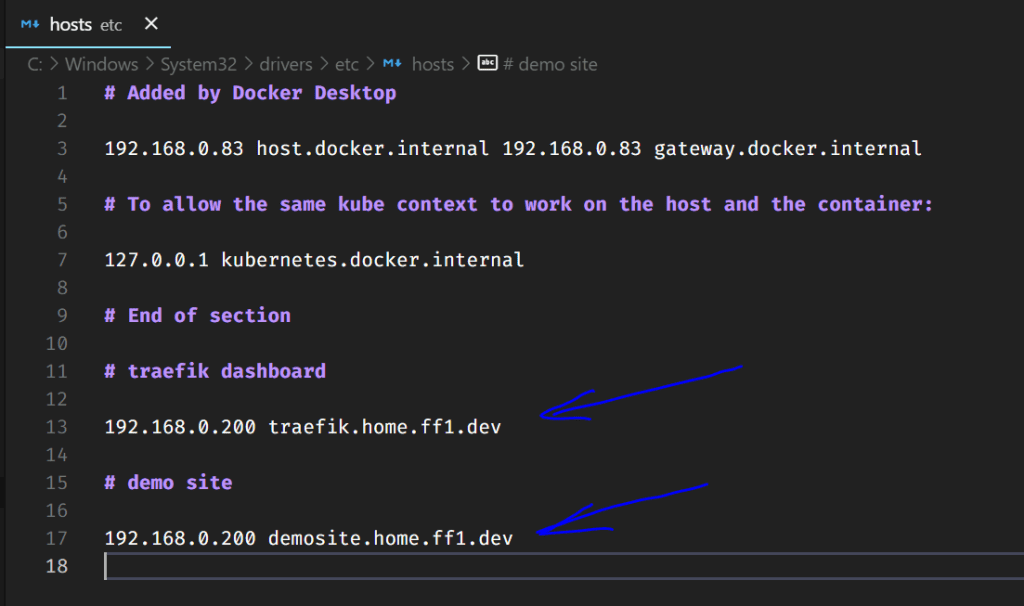
I created 2 new entries in this file, one for the traefik dashboard and another for a simple Nginx, to serve as an example of complete deployment here.
How to expose the traefik dashboard?
Let’s now expose the traefik dashboard. You will probably have better monitor tools for your cluster in the future, but as it’s already there, why not use it, right?
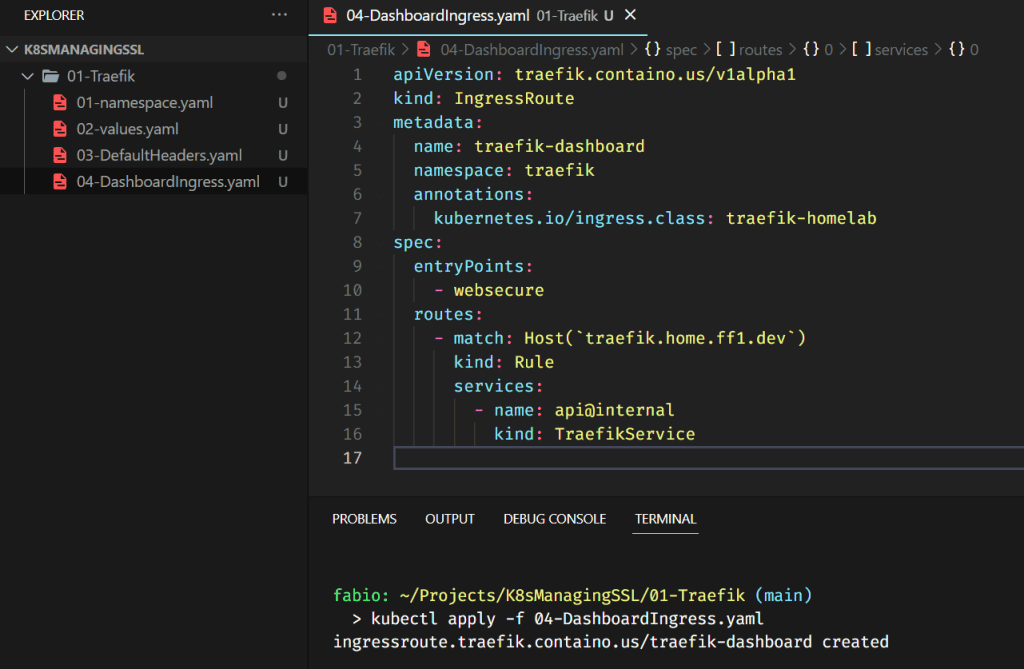
As the dashboard application is already running, the only thing we need to do is to define the ingress route configuration.
Important points here: the ingress class is the one we just created (and named), so, in your case, if you put a different name there, do not forget to change it here as well.
The match part of the file is the address you expect to receive from the request. In my case, here is the following: traefik.home.ff1.dev, you need to adjust it to match your domain and the entry you configured into your hosts file.
Let’s test it in our browser and see what happens.
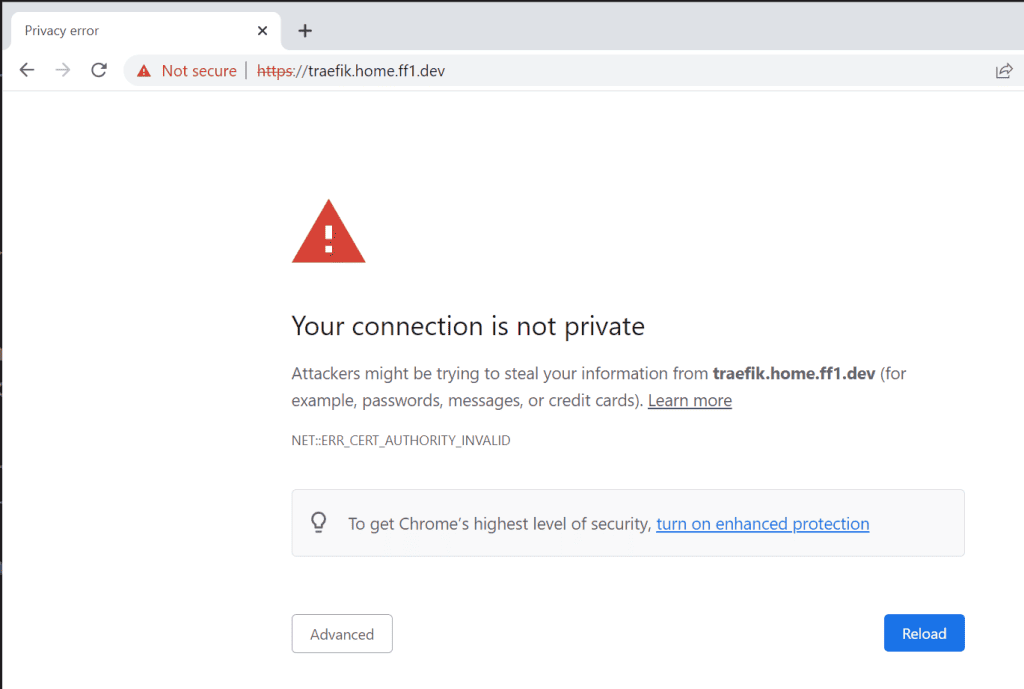
Ouch, what’s that? Well, we are telling traefik to redirect to an https connection without providing a certificate. This is the expected behavior from the browser; it tries to read the certificate and receives a generic certificate from traefik (which means nothing for the browser), which is considered unsafe navigation.
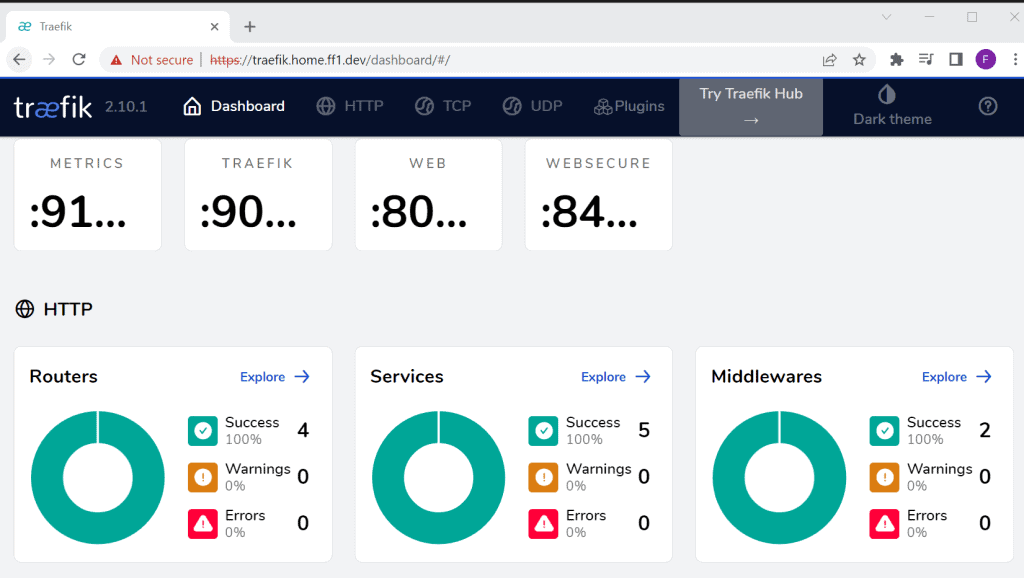
Click on the “advanced” button, and if there’s no link to proceed there, type “thisisunsafe”, and Chrome will allow you to see the site. I know it’s weird, but it is how Chrome was developed.
How do https and certificate work?
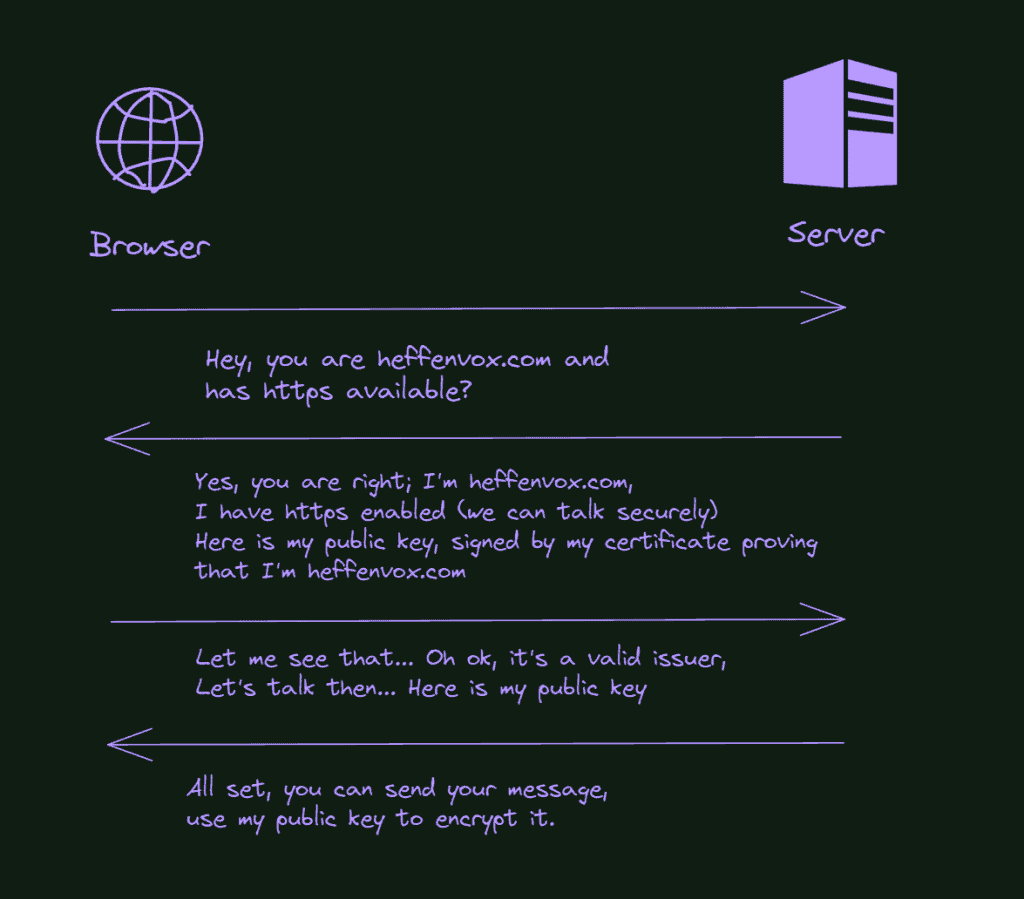
What is https? HTTPS means that your requests are being encrypted from the source to the destination. To make it happens, the browser and the server need to talk with each other and make some “agreements” before the first byte of your request or the response from the server is transmitted.
Trying to simplify it a lot; this agreement is more or less that way:
- The browser gets into the server and asks for https.
- The server responds with a public key for the browser to encrypt the message.
- The browser then sends its public key to the server to encrypt the responses.
- When the browser encrypts the message with the public key from the server, nobody can open this message anymore, only the server (with the private key to decrypt that message).
- The server does the same, encrypt the response with the public key it received from the browser, and sends it back. Only the browser will be able to open this message.
That’s good but what about the certificates? Well, can you spot a failure in the process described above? There’s an attack called the Man in the Middle. In this attack, someone intercepts your message before it gets to the server and answers you with a public key. The browser will never know if this person is not the server it wants to send the message to and then proceeds with the communication described above. Everything is secure but with the wrong person.
This is why we need the certificates. A certificate is like an ID of the server, a passport issued by an official (like the government) proving that you are the person (or server) you are affirming to be.
So, in the process described above, besides the public key, it is also “signed” by another key (the certificate one). With this information, the browser knows the server is the correct one and that the key it just receives comes from this server.
Of course, there are more details on it, but the idea is exactly that… Let’s go back to the practice.
How to request a certificate?
It’s time to fix our certificate issues and have secure access to our applications. We will use some pieces here, first of all, the Cert Manager. It is a service responsible for communicating between the issuer (Let’s encrypt) and our cluster… Requesting, storing, and updating the certificates automatically.
The issuer (Let’s Encrypt) needs to verify if we are the owners of the domain we want the certificate; if not, we could ask for a certificate in the name of Microsoft or Google, right?
There are a few ways to do that; the most common is via an agent. It is installed in your server and opens a communication port with the Let’s Encrypt server. It will not work for us since our cluster is not exposed to the internet.
Another way for Let’s Encrypt to validate we own the domain is via a DNS entry. When you request a certificate, Let’s Encrypt will send you a token you need to put as a TXT record in your domain DNS.
It’s a pain in the neck to configure it manually, but here is the trick, we will use Cert Manager and the CloudFlare API to make it automatic for us. How cool is that?
But one step at a time, let’s first install and configure the cert-manager.
How to install and configure the Cert-Manager?

Starting with the namespace, plain and simple.
Apply the Cert-Manager crds (custom resource definitions). You can find (and apply it) directly from the vendor’s GitHub repository (https://github.com/cert-manager/cert-manager/releases).
kubectl apply -f https://github.com/cert-manager/cert-manager/releases/download/v1.12.1/cert-manager.crds.yaml
Then add the helm repo if you don’t have it yet:
helm repo add jetstack https://charts.jetstack.io
helm repo update
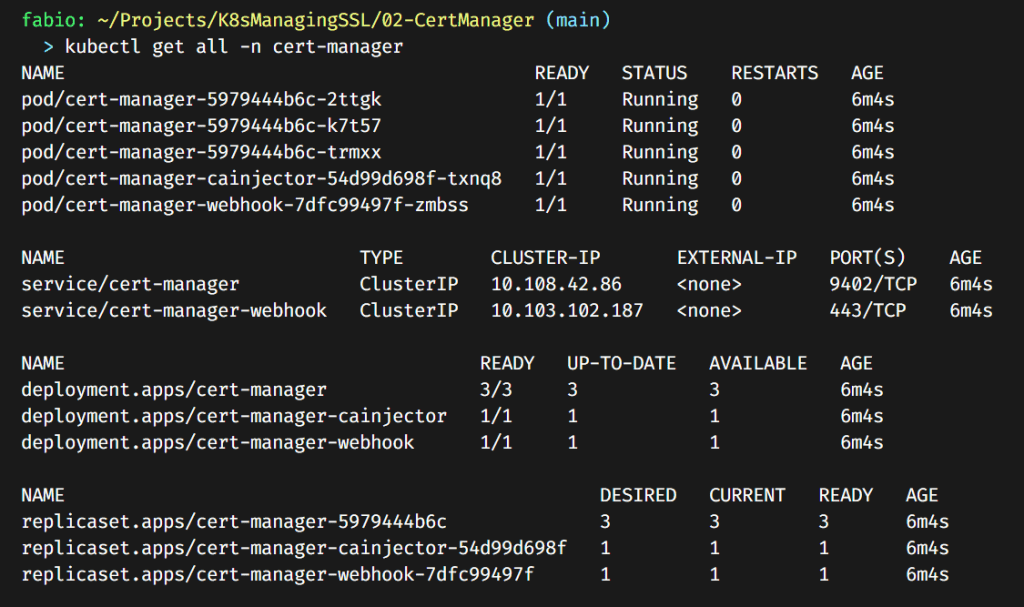
helm install cert-manager jetstack/cert-manager --namespace cert-manager --values=02-Values.yaml --version v1.12.1
What we have here… We are telling to cert-manager to use the dns01 method to perform the domain ownership challenge (as we comment above) using the DNS of Cloudflare (1.1.1.1) and another one, in this case, Quad9.
This is important and tricky; if you misconfigure DNS entries or calls, it is hard to debug and find the failure… So, pay attention to these files.
Now that our cert manager is running, we need to configure our issuer. Remember, this is the “authority” that will create the certificate for our domain. In our case, we will use the Let’s Encrypt.
Let’s Encrypt has 2 environments for you to use, staging and production. The idea behind the staging is to test your configuration. You can request as many certificates as you want; if they fail, they will not block you out.
The production environment is more sensitive; if you misconfigure something and get a few failures in a row, it will block you temporarily (sometimes for a week or so).
Let’s do the recommended way, at least for the first certificate, and then, when we are confident that our configurations are correct, we use the production version.
How to configure Cloudflare to help with the Let’s Encrypt and Cert Manager?
Before moving forward with our issuer deployment, we need the third piece of this plan, our DNS server.
Recapitulating: The Cert Manager will request the certificate to Let’s Encrypt, which will send a token to verify our ownership of the domain. As we will provide Cert-Manager with access to our Cloudflare account, it will be able to read and write our DNS records and automatically do what Let’s Encrypt needs.
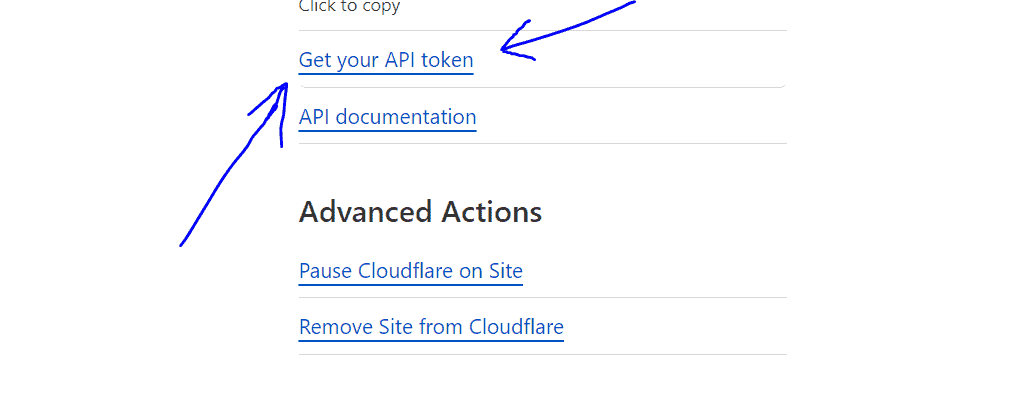
So, to make it happen, log in to your Cloudflare account and click on the link “Get your IP token”, if you cannot find it, here is the link (https://dash.cloudflare.com/profile/api-tokens).

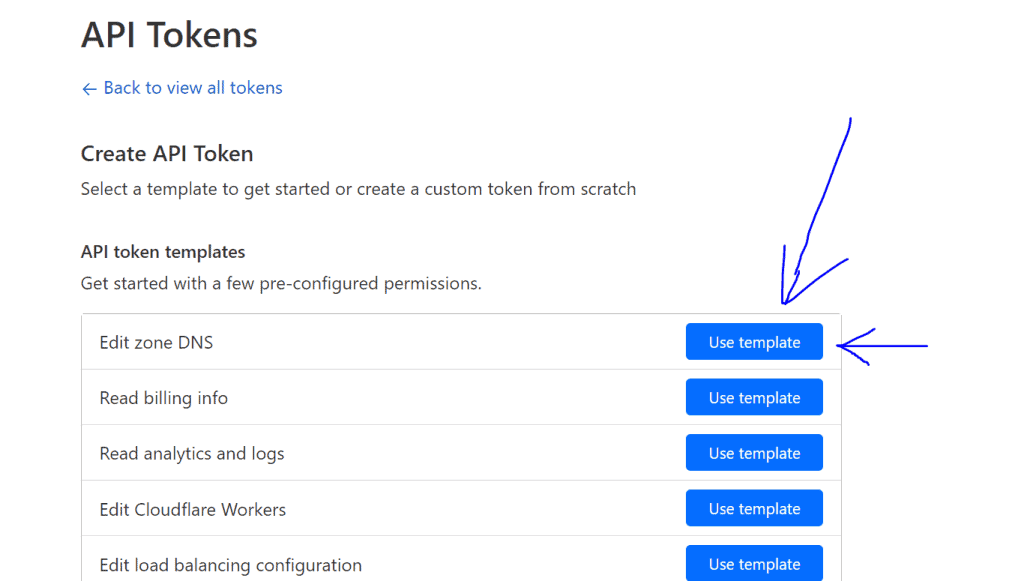
Hit the button “Create Token” and select the “Edit zone DNS” template.
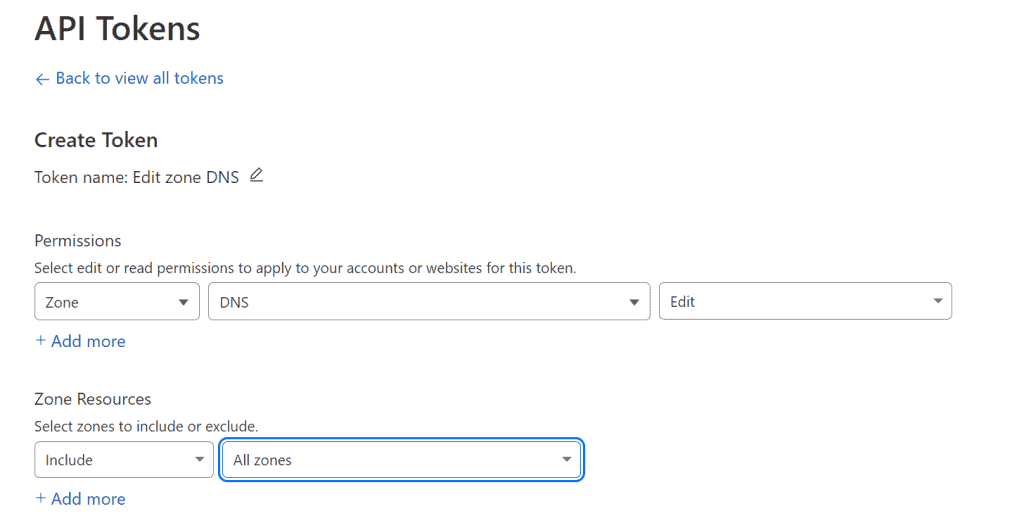
Select all zones or the specific domain if you want.
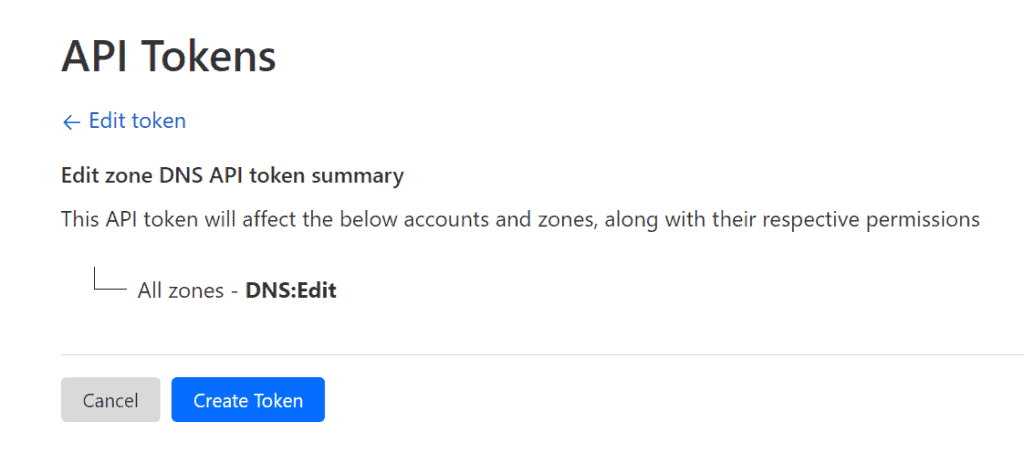
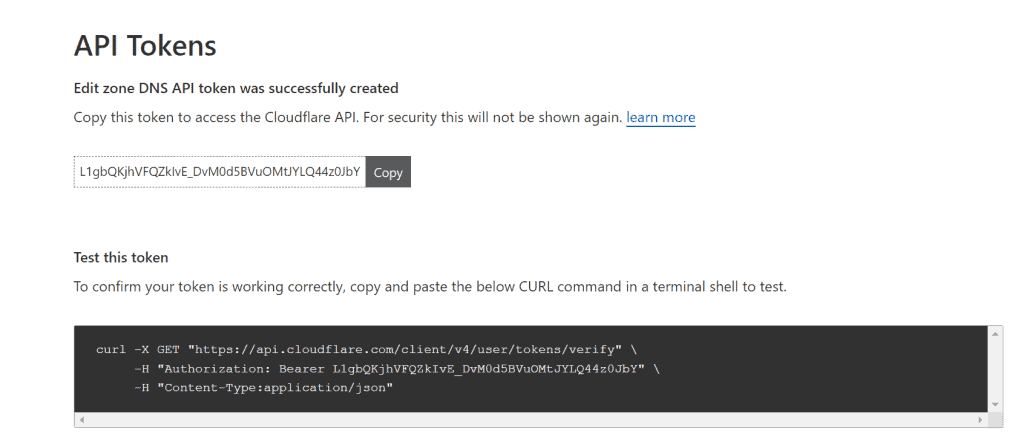
Create the token and copy this value; we will need it into our issuer configuration.
On the Cloudflare site, that’s it… Now we will store this token in a secret key inside our cluster and use this secret key in the issuer.

PS: Of course, you don’t want to show your token to anyone; I deleted this token from my Cloudflare before posting this article 😉
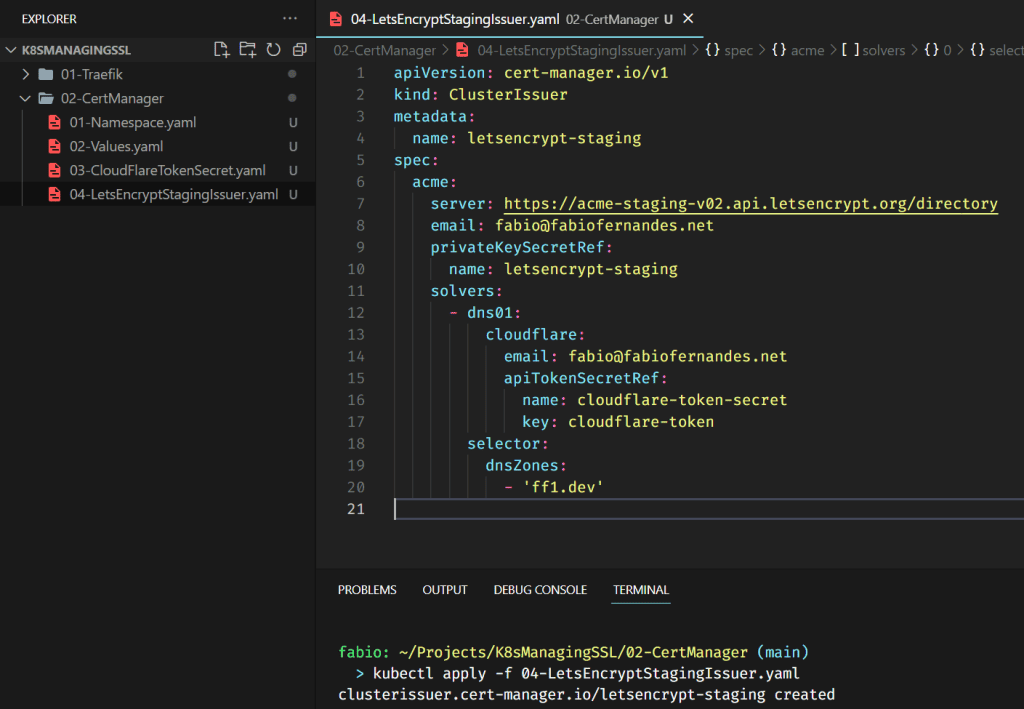
How to configure Let’s Encrypt issuers for Cert Manager?
Finally, we will deploy our issuers; let’s start with the staging version and test it. Then we can create the production and get the certificate for real.
Now that we have the issuer running, we can request our first certificate.
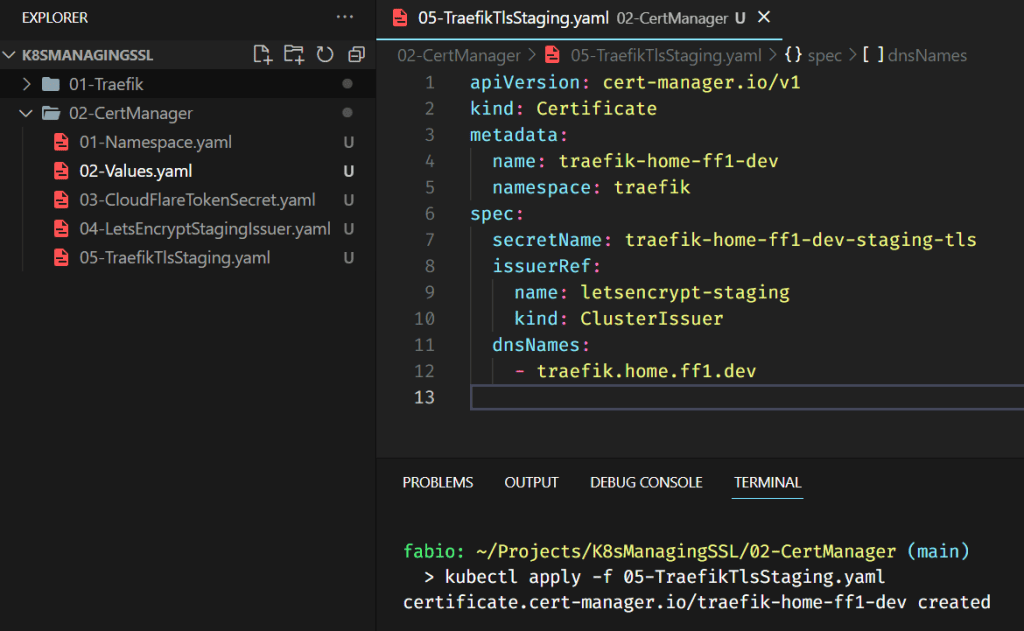
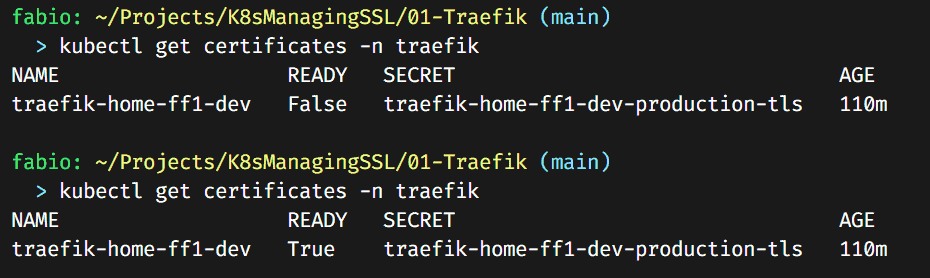
You can verify the certificates with the command: kubectl get certificates -n traefik. It will take some time; the certificate issuer via DNS can be slow.

Eventually, it will turn to ready status.

Now let’s update our traefik dashboard ingress file, making it use this new certificate.
We will still receive the invalid certificate message because we are using the staging version of Let’s Encrypt. But, if you check the certificate details, you can see the certificate was issued by Let’s Encrypt staging service.
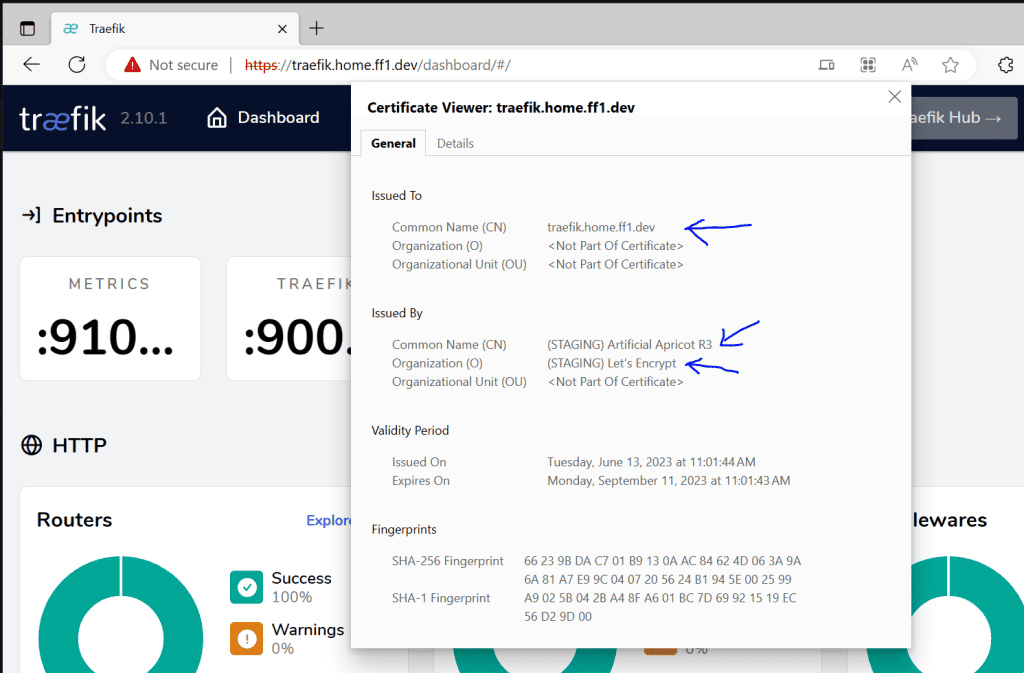
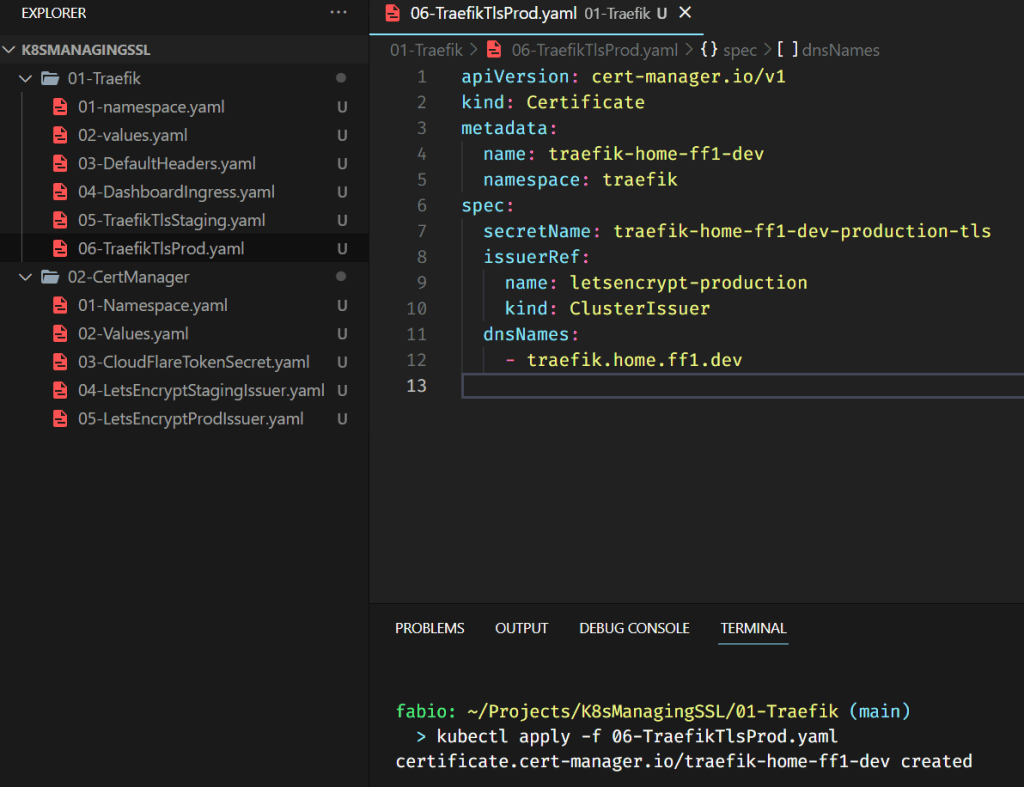
It proves that our configuration works fine, and we can create the production version.
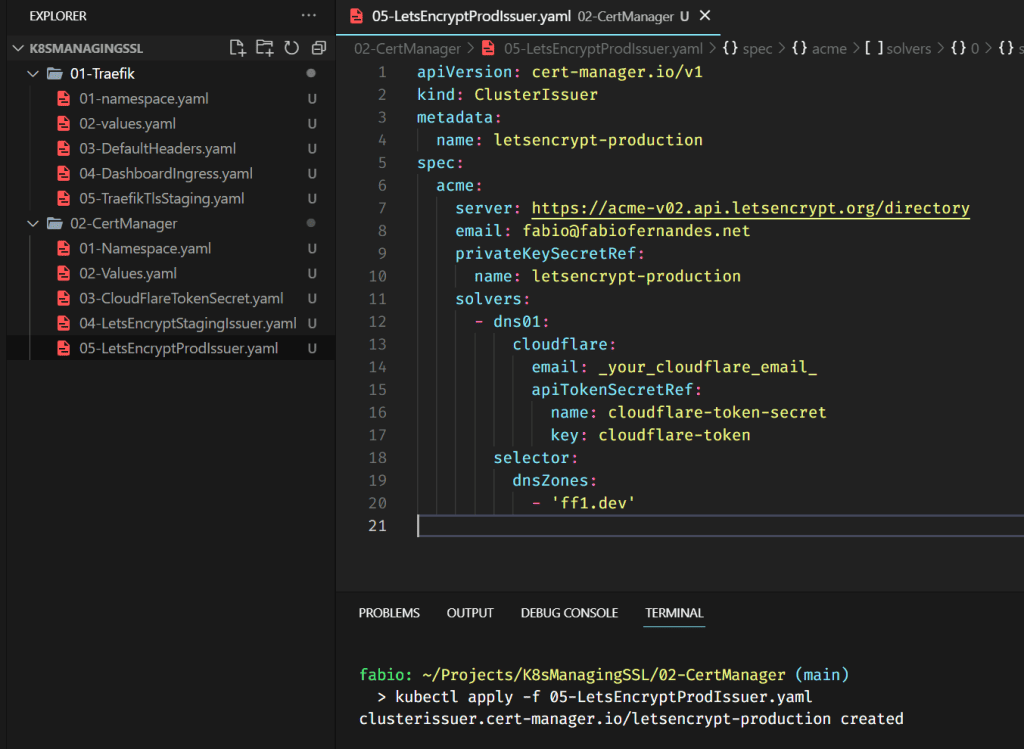
Pay attention; the prod configuration is pretty similar to the staging configuration.
Again, pay attention that are a few items different from staging.
PS. I use the same certificate name here; there’s no reason to maintain the staging one being updated at every expiration. I maintained the secret value with the staging certificate, but it’s optional as well; you can delete it if you want after testing the production version.
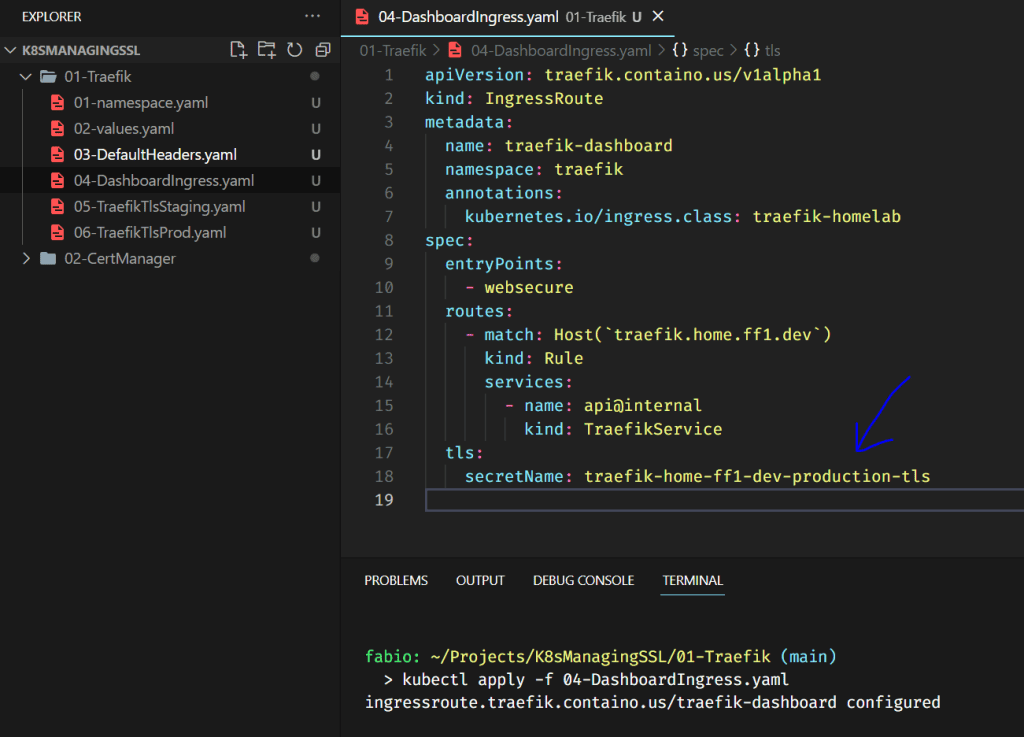
Changing the dashboard configuration one more time. Now to read the certificate stored on the production secret value.
And here it is. The traefik dashboard with valid certificates issued by Let’s Encrypt, automatized by Cert-Manager with the help of Cloudflare API.

Deploying a Demo Site with certificates and ingress
Now, to put all into practice, let’s create the necessary files to deploy a website using our NGINX customized image with ingress and valid certificates.
Here is a quick recap of the necessary files:
- Namespace
- Deployment
- Service
- Certificate
- Ingress
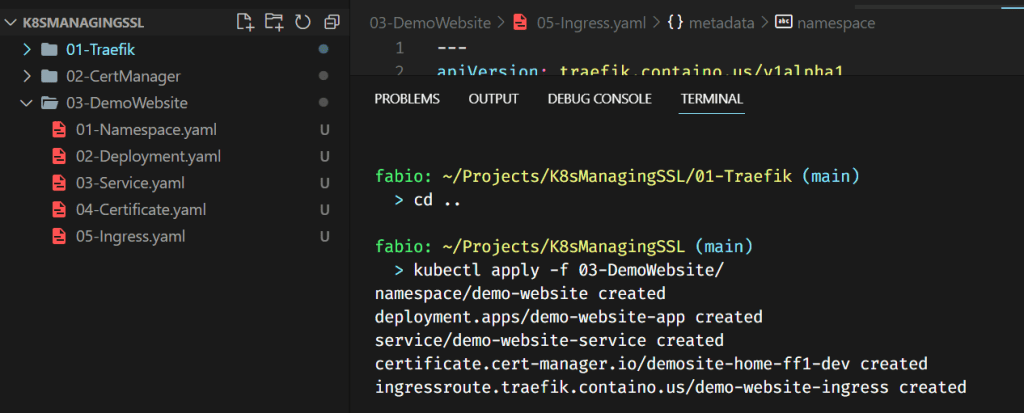
Maybe you don’t know; you can apply all files in a folder with the kubectl apply command, as you can see in the picture
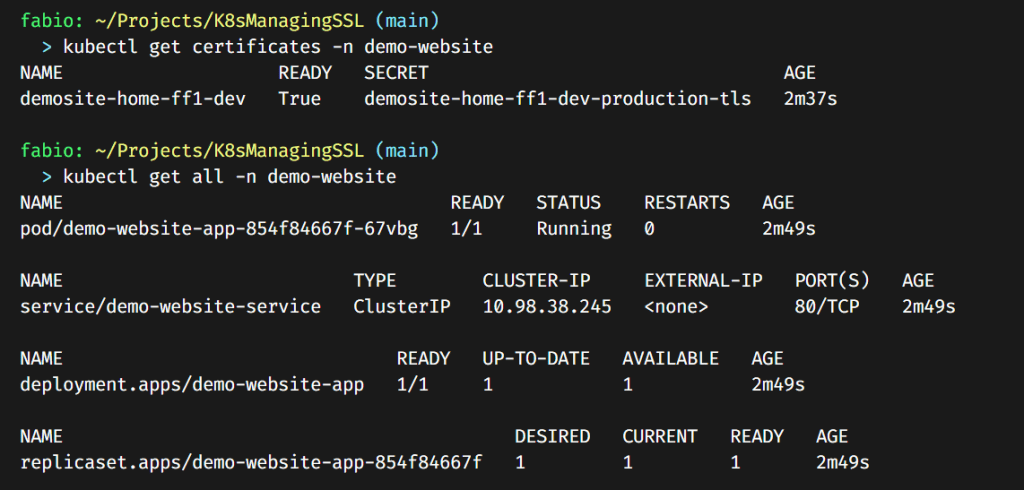
Everything is running as expected; let’s check the browser…
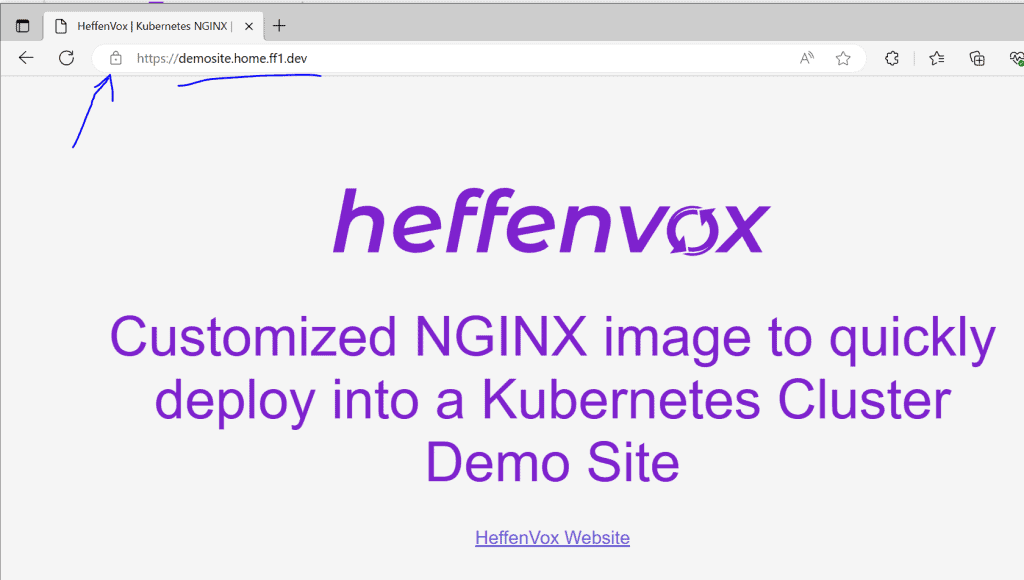
Here we are; everything is working perfectly.
Conclusion
In this long tutorial, we’ve managed to navigate through a comprehensive journey of setting up and managing SSL in a Kubernetes homelab, with an eye on professional-grade techniques. We began by identifying the prerequisites, which included a Kubernetes cluster, a load balancer, and a domain name. We then proceeded to install and configure Traefik for our specific scenario, delving into the specifics of optional headers, DNS planning, and configurations.
It is crucial to remember that understanding and managing SSL is a vital part of maintaining secure, professional-grade IT systems. By leveraging tools like Kubernetes, Traefik, and Cert Manager, as well as services such as Let’s Encrypt and Cloudflare, we can build a robust, secure, and scalable environment. This walkthrough should empower you to manage SSL in your Kubernetes homelab effectively and professionally, laying the foundation for further explorations and developments in your IT journey.