So you already started to work with Kubernetes, created the cluster, and deployed the first pods and the first services. Maybe now you can access your web app like this: https://10.0.0.0:30020. That’s cool, but not exactly what you want, right? An address like https://myawesomeapp.com would be way better. It is exactly there where the ingress controller enters the k8s scene. Continue to read, and you will definitely understand how it works and, as usual, with practical examples.
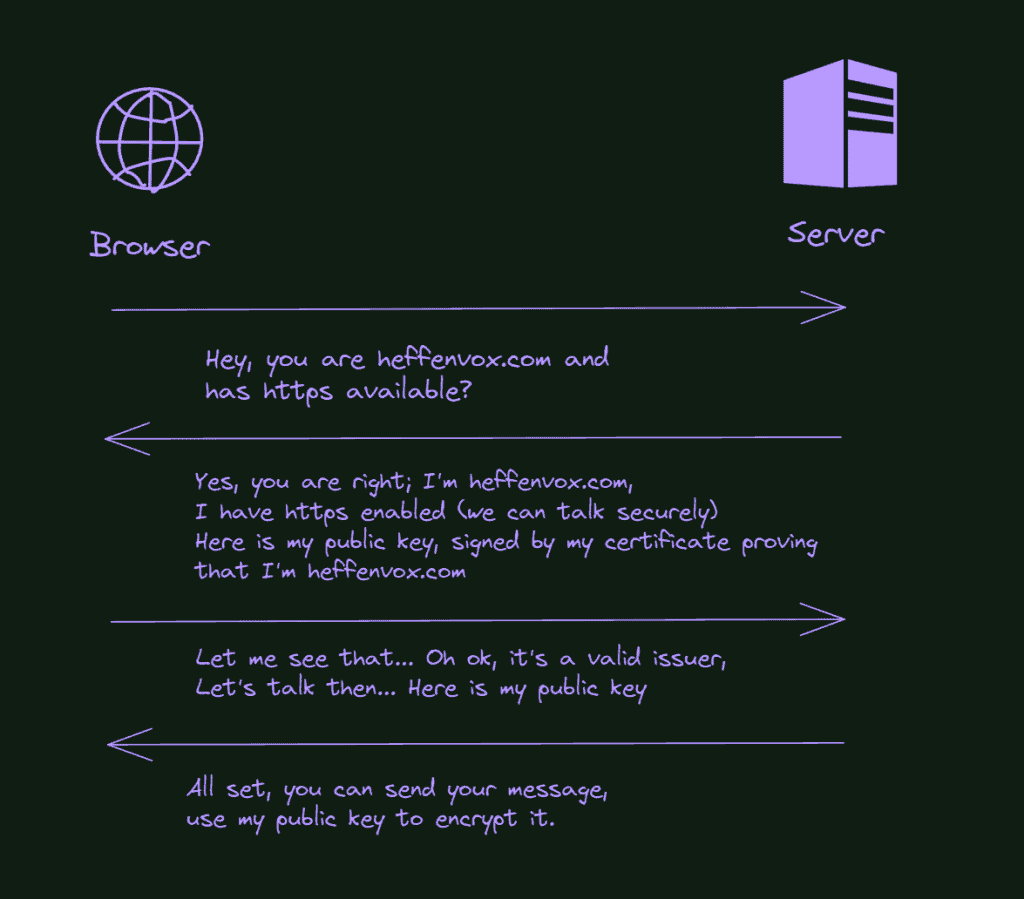
Kubernetes ingress controllers are used to externally expose your services that are pointing to your containered applications inside the cluster. It differs from the NodePort because it understands the http protocol working on the application layer of the network communication (OSI Model). It also works as a load balancer for your applications and can handle the SSL/TLS protocols.
How are the applications exposed in Kubernetes?
In Kubernetes, there are three common approaches to doing this job:
- NodePort: It’s the most basic one. If you are following the posts here, you already configured this kind of exposition on https://heffenvox.com/how-to-use-nfs-in-kubernetes-cluster-step-by-step/ and https://heffenvox.com/how-to-install-kubernetes-the-definitive-guide/.
- Loadbalancer: It exposes the service using the cloud provider’s load balancer and automatically creates the necessary NodePorts and ClusterIPs to route the desired traffic. This is the default way to route traffic on the cloud (sometimes the only way since the k8s on the cloud are normally managed, and you do not have much access to change how things work)
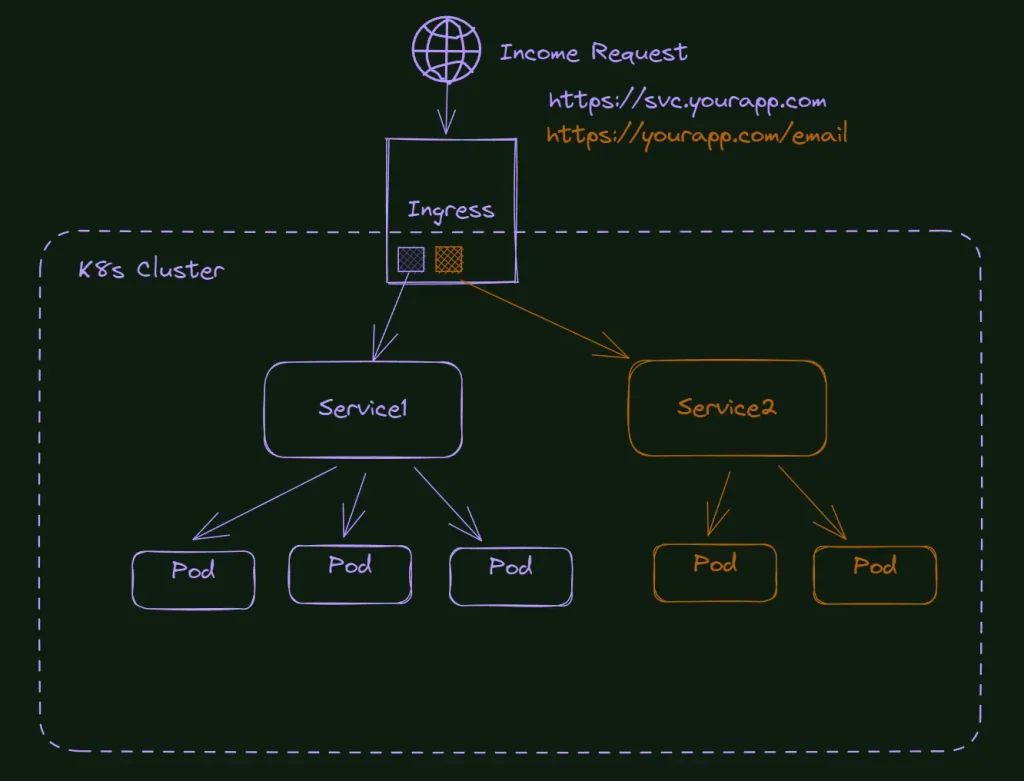
- Ingress Controller: It’s an object that provides routing rules, redirecting the external traffic to your internal services. It is normally used with HTTP protocol and uses domains, subdomains, and HTTP verbs to define the correct service for the income request.
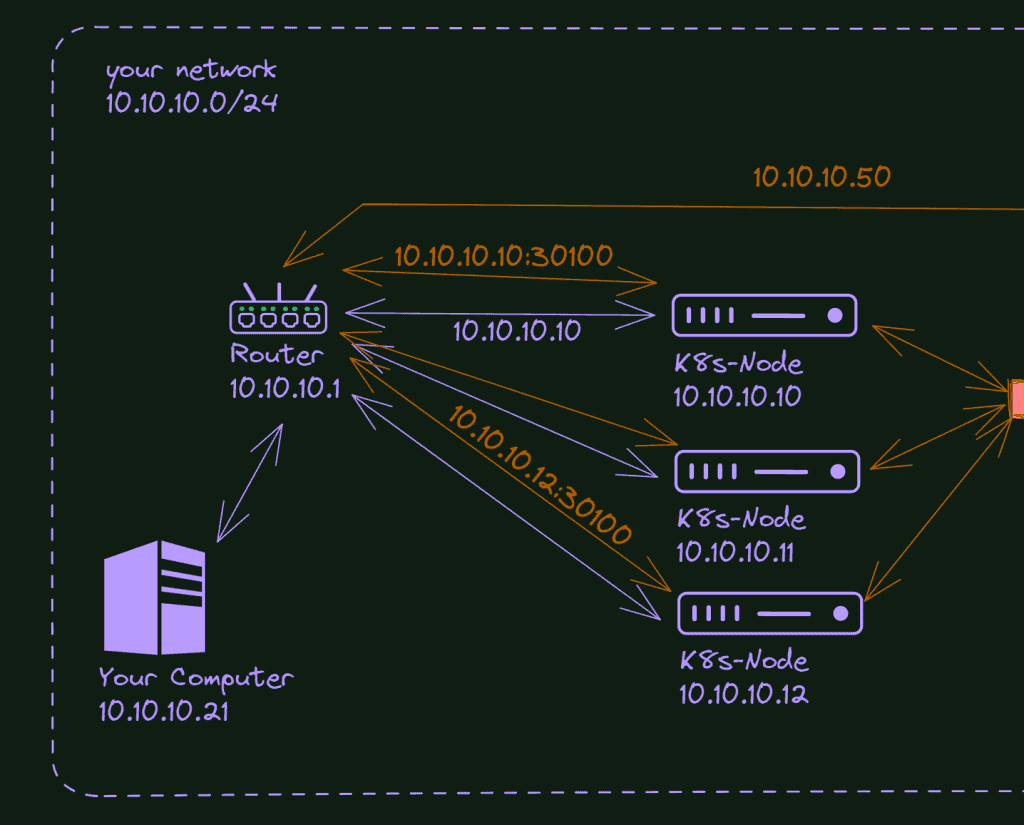
How does the NodePort work in Kubernetes?

In Kubernetes, you can use the NodePort feature to allow external traffic to access your service. Within a Kubernetes cluster, the main method of communication is through internal IP addresses; however, there may be instances where you need to expose a specific service for external access. At this point NodePort becomes useful.
Nodeport configuration is done directly on the Service yaml. This is one of the easiest ways to expose your service, but not much robust. You can use it freely for your lab, dev, and tests, but I advise you to consider other methods for production environments.
Remember: Services work on the fourth level of the OSI Model, the transport level. It doesn’t understand HTTP; the only way to handle the traffic is by using IPs and Ports. The Kubernetes will allocate the specified port on each node of the cluster and redirect the requests to that port to your service.
How does the load balance work in Kubernetes?

In Kubernetes, when a service is defined and linked to a group of pods (typically via label selectors), any incoming traffic addressed to that service is automatically distributed among those pods. This function is carried out by kube-proxy, a network proxy running on each node in the cluster. This internal form of load balancing uses a round-robin scheduling algorithm, ensuring each pod gets its fair share of the workload.
This is a load balancer, but here we are talking about the service type load balancer… When you define your Kubernetes service of the type load balancer, it will try to get an external IP (provided by an external service). If your cluster is on the cloud, your cloud provider will spin up a load balancer in response to your new service and provide the IP to your service; you don’t need to care about it. Although if you are using an on-premises solution, you will need to install a load balancer service to connect with your Kubernetes cluster. This is not the topic here, but a well-known service to do it is the metallb.
How does the ingress controller work in Kubernetes?
The ingress object is a completely independent resource in a Kubernetes cluster.
Ingress in Kubernetes is not a service type but rather provides HTTP and HTTPS routing to services depending on a set of rules. It is an effective tool for exposing your services to the outside world, and it provides more extensive and fine-grained routing capabilities than a simple LoadBalancer service. Ingress can deliver services with publicly accessible URLs, load balance traffic, terminate SSL/TLS, and provide name-based virtual hosting.
What are the most popular ingress controllers in Kubernetes?
There are several Kubernetes ingress controllers in the market today, but I will mention my top four of this big list, and later in this article, I will show you how to install my favorite one.
Kong ingress controller

Kong is a big company dedicated to products related to APIs and networks. Kong Ingress is built upon the NGINX ingress controller with the addition of expandable modules to broaden its capabilities.
One of Kong’s strengths is the vast array of plugins it offers, bolstering its capabilities and allowing for custom functionality. With these plugins, you can implement functionalities like authentication, rate-limiting, transformations, and much more, which can greatly aid the control of traffic in your applications.
HA Proxy ingress controller

HA Proxy was written in 2000 by a core contributor of the Linux Kernel (Willy Tarreau) and rapidly gained popularity in the industry. It’s well known for its performance and capacity to handle hundreds of thousands of requests.
The HAProxy Ingress Controller harnesses the power of HAProxy’s versatile load-balancing capabilities to route traffic to your Kubernetes services. Like any other Ingress controller, it interprets Kubernetes Ingress resources to determine how to route traffic. But, with HAProxy under the hood, it offers a level of flexibility and performance that’s hard to beat.
NGINX Ingress controller

NGINX ingress is by far the most popular ingress controller for Kubernetes.
One of the NGINX Ingress Controller’s strengths is its wide array of features that provide fine-grained control over HTTP traffic. You can configure it to handle different types of traffic in different ways, enabling the implementation of complex routing rules. This means you can have different redirections based on factors such as the request path, host, or headers.
Traefik Ingress controller

The best description of Traefik comes from its official website:
Traefik is an open-source Edge Router that makes publishing your services a fun and easy experience. It receives requests on behalf of your system and finds out which components are responsible for handling them.
What sets Traefik apart, besides its many features, is that it automatically discovers the right configuration for your services. The magic happens when Traefik inspects your infrastructure, where it finds relevant information and discovers which service serves which request.
I used traefik for a long time, even before using Kubernetes. It is an awesome dynamic routing for the docker environment. Besides that, if you follow my posts, you know I love the K3s, a distribution of Kubernetes modified by Rancher. And guess what? The Traefik is the ingress controller packaged in this distribution.
So, let’s install this controller into our cluster!
How to install Traefik Ingress Controller into your K8s cluster?
It’s practice time to demonstrate what the ingress configuration can do for you; let’s roll our sleeves up and configure the Traefik Ingress controller into our cluster. We will also access the web UI administration of Traefik (just because it is cool) and configure a demonstration site with ingress.
What do I need to follow this tutorial?
To follow up with this tutorial, you must have a Kubernetes cluster running on your network. I will use the cluster we created here: How to install Kubernetes: The Definitive Guide and modified here: How to use NFS in Kubernetes Cluster: Step By Step. You can also use a raspberry pi cluster as demonstrated in this article: How to install Kubernetes on Raspberry Pi: Complete Guide. I think it is fun to work with Raspberry, but I decided to use AMD64 hardware for these tutorials since it’s the most common scenario for the Kubernetes market.
What is Helm and Helm Chart, and why do I need it?
If you are familiar with my posts, you know I try as much as possible to explain the Kubernetes installations file by file because I believe it is the best way to learn what’s going on and start to connect thoughts that will lead you to become a better professional.
Although, things in the Kubernetes world are always changing. New engine versions are constantly released, new API versions are released (this is why you see v1, v1-beta, etc., in yaml files), new container images are created, and so on.
Given this characteristic, most companies (and communities) decided not to document the individual files anymore but instead update a “package” with all the files needed for the installation.
One of these companies is Traefik, and as you can see in the official documentation, among the options to install traefik, you don’t have the yaml files anymore.
The most popular “package manager” for Kubernetes is Helm, and the packages are known as Helm Charts.
Helm charts are nothing more than a group of yaml files with configurable variables, so it’s not that difficult to extract the official yaml files from helm charts if you need it. Still, it’s always best to use the official installation recommendations from the product’s creator.
Install Helm into Kubernetes
There are two parts to Helm: The Helm client (helm) and the Helm server (Tiller).
The first thing we need to do to be able to install the traefik helm chart is to install the Helm and add the Traefik repository.
Check out this documentation page to see the best way to install Helm for your OS.
As I’m using Windows here to take the screenshots, I will show the step by step to do it. If you use Linux, it’s way simpler with the script provided by Helm.
How to install Helm on a Windows machine?
Visit the official Helm releases page on GitHub and download the amd64 version (it’s a zip file)

The content of the zip file is a folder (windows-amd64); inside it, you see the helm.exe, the license file, and a readme.
I unzipped this content and created a helm folder inside Program Files to hold it.

Added the path to my environment variables, and it should be working in any terminal.
How to deploy the traefik ingress controller?
With the helm installed, the only thing we need to do is to add the repositories to helm repositories, do a quick update, and install traefik… The commands are the following:
helm repo add traefik https://traefik.github.io/charts
helm repo update
helm install traefik traefik/traefik


With everything installed, we can port-forward the Traefik-created pod and visualize the dashboard.

Here is the result that shows we have our Traefik up and running in our system.

Conclusion
I hope this article helped you to understand a bit better how Ingress work and about routing in general in Kubernetes Clustering. This is just the beginning; as you can see, this default traefik installation is far from production ready, and we still need some fine-tuning and configurations on this work.
Besides that, we didn’t actually make any site work with the new ingress controller. In the next article, we will do that; we will finalize the traefik configuration and create some entry points to our demo sites. I want to pass through these configurations deeply since many options exist to make it work, and, for sure, it deserves a post dedicated to it.