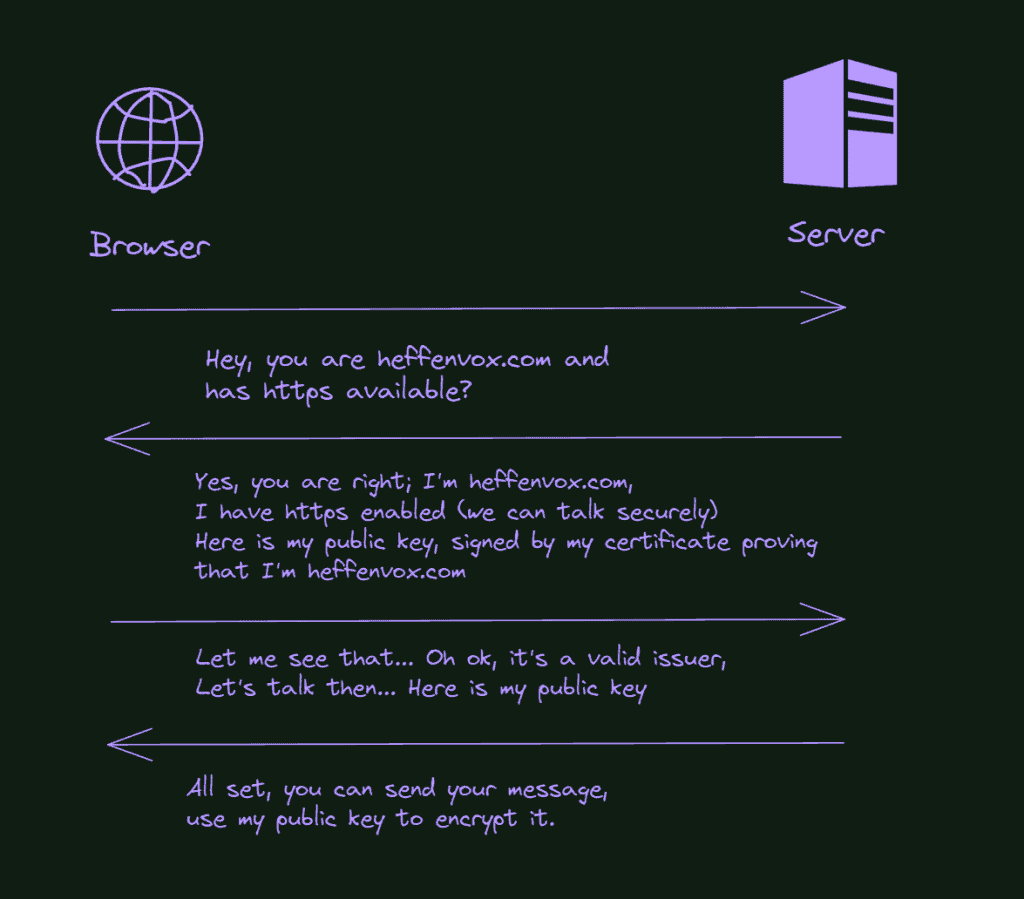
Cluster IP, Names, Domains, Certificates, http, Nodes, internal and external access. Do all these terms look confusing? In this article, let’s discuss a bit more about it, and hopefully, you will have a different experience when facing these terms again later. I will cover some theory and, of course, a lab practice to fix the knowledge.
There are two ways (and a half) to access the K8s externally. The NodePort service opens a given port in all nodes (in detail later), and the load balancer service allocates a valid IP (for your local network or the internet) and redirects the traffic coming to this IP to your service that will redirect it to the pod/container app. What about the “half”? We can use port forward, but it is more a way to test if your service is correctly configured than a production alternative; this is why I call it “half”.
Let’s explore it with theory and practice labs to improve your high-level understanding of the Kubernetes network. Believe me: it can avoid many headaches in more complex future scenarios.
How does the Kubernetes network function?
Let’s take the scenario of your home network. The same principles can also be applied to the cloud, but it’s easier to explain with a local network.
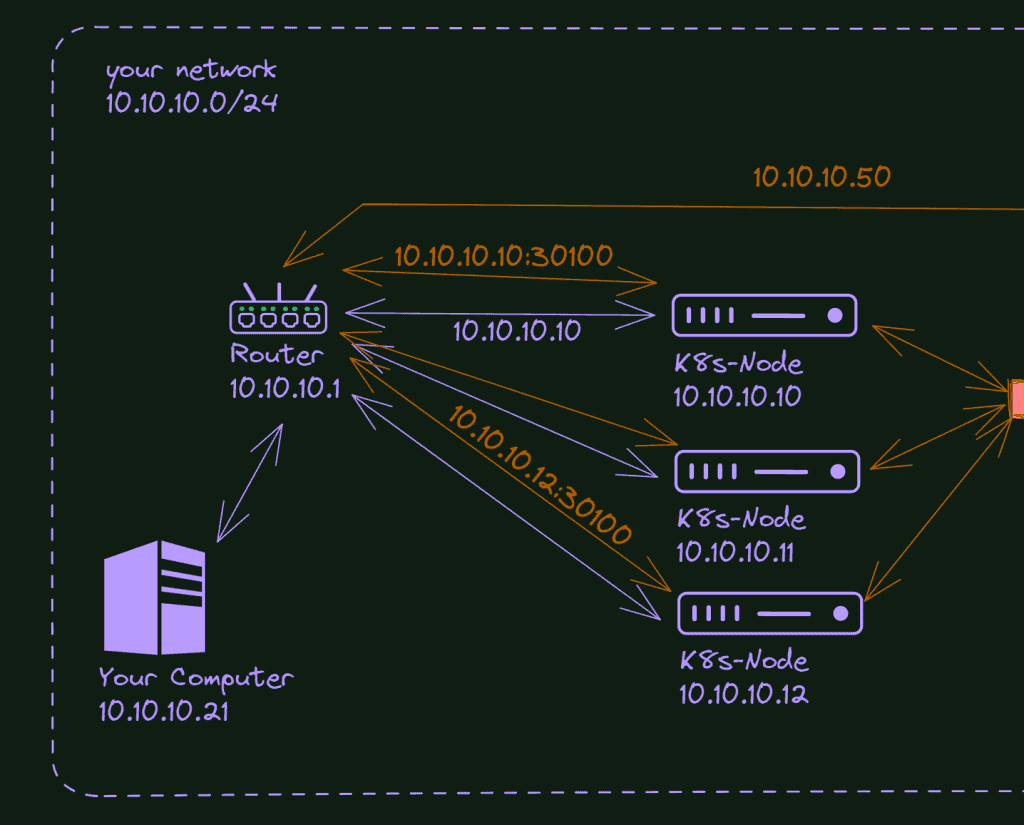
Every device in your home network has an IP; if you pay attention, you will see they are similar. Let’s say your phone is 10.10.10.5, and your tv is 10.10.10.37; you can see a pattern here, right? This is your local network. Some configurations, most probably in your router, make it happen and provide communication between the devices and access to the internet world.
When you create a Kubernetes cluster on this network, you will connect a few machines to it or make some virtual machines also connected to your network via the host interface. The critical part here is your Kubernetes Nodes will receive an IP from your router (or you configured it manually but under the same “range”).
Let’s say your nodes are 10.10.10.10, 10.10.10.11, 10.10.10.12. They are in the same network as your computer, TV, mobile phone (via wifi), etc. This is why you can connect to your cluster, execute commands or even ssh on it.
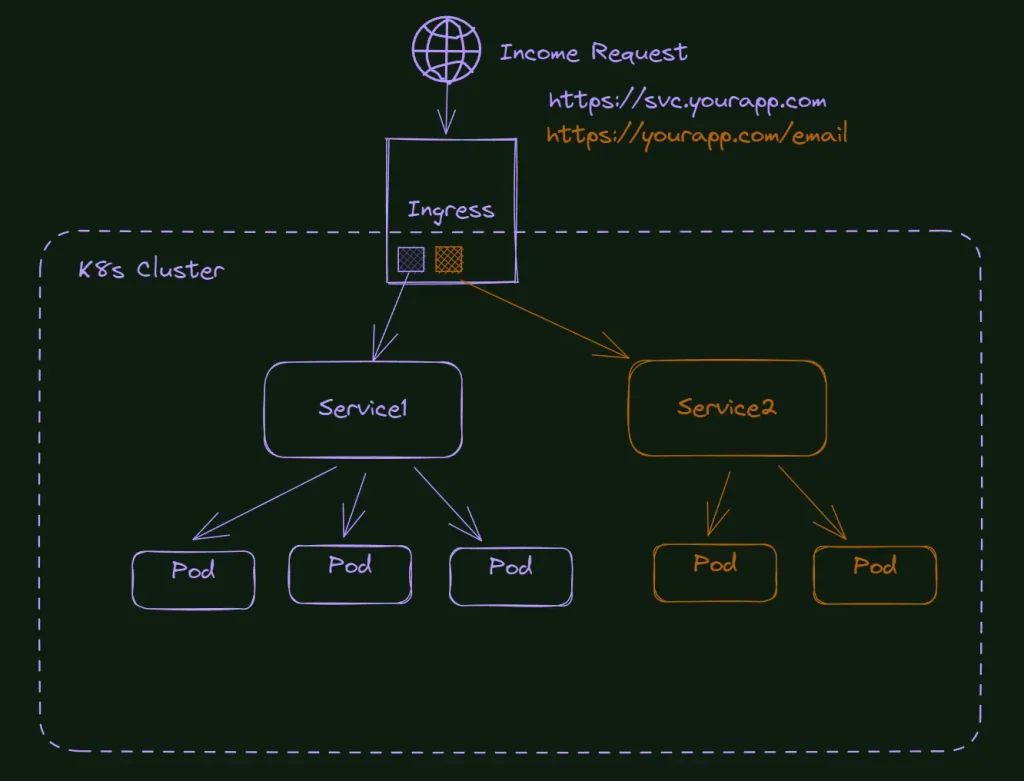
Although, Kubernetes also creates an isolated network inside the cluster. You don’t have access to this network (unless you ssh inside a node). Every service you create inside your group will receive a different IP pertaining to the cluster network, not yours. You cannot access it directly from outside your cluster.
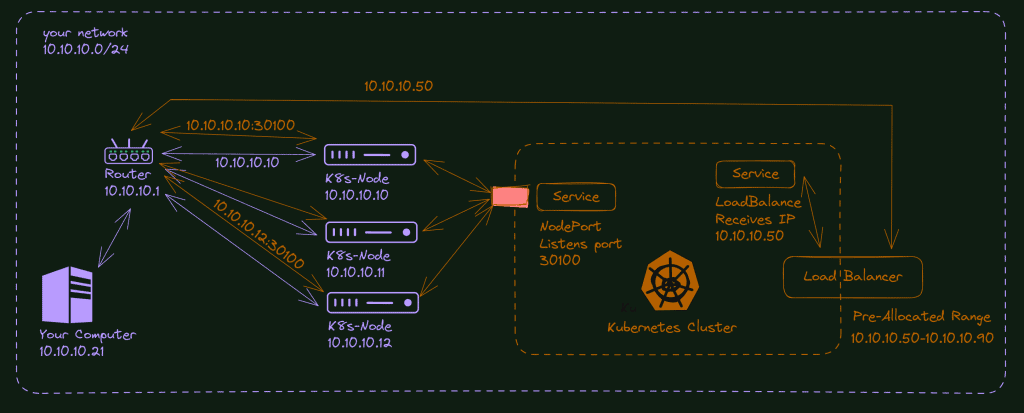
You will most need a Load Balancer to make it happen. A load balancer will allocate one of their pre-allocated IPs to your service. If you are in any cloud, you don’t need to care about it. The cloud providers already have a pre-configured load balancer and the Kubernetes control plane configured to allocate an IP to your service automatically. In your home lab, you will need to install and by yourself a load balancer application to do the same. We will do it together.
The other way Kubernetes uses to make it possible to access internal IPs is via NodePort. This service opens a port in all the nodes and starts to listen on this port. If a request is made to the node IP (10.10.10.11, for example) and in the configured port, this service repasses this request to the pod/container of your app.
Does it make sense? If not, bear with me that it will make more sense during the lab.
What do I need to follow this tutorial?
To follow up with this tutorial, you must have a Kubernetes cluster running on your network.
I will use the cluster we created here: How to install Kubernetes: The Definitive Guide.
You can also use a raspberry pi cluster as demonstrated in this article: How to install Kubernetes on Raspberry Pi: Complete Guide. I think it is fun to work with Raspberry, but I decided to use AMD64 hardware for these tutorials since it’s the most common scenario for the Kubernetes market.
As usual, all the files in this tutorial are available on my GitHub: https://github.com/fabiofernandesx/K8sNetwork.
Creating a Custom NGINX Image
To make the lab a bit easier and also show something else in this tutorial 😉 I will create a custom Nginx image and publish it to the docker hub registry… I want to change the default NGINX page with a custom one so we know it is the correct application.
The first thing is to create the index to replace the docker file with the specifications.
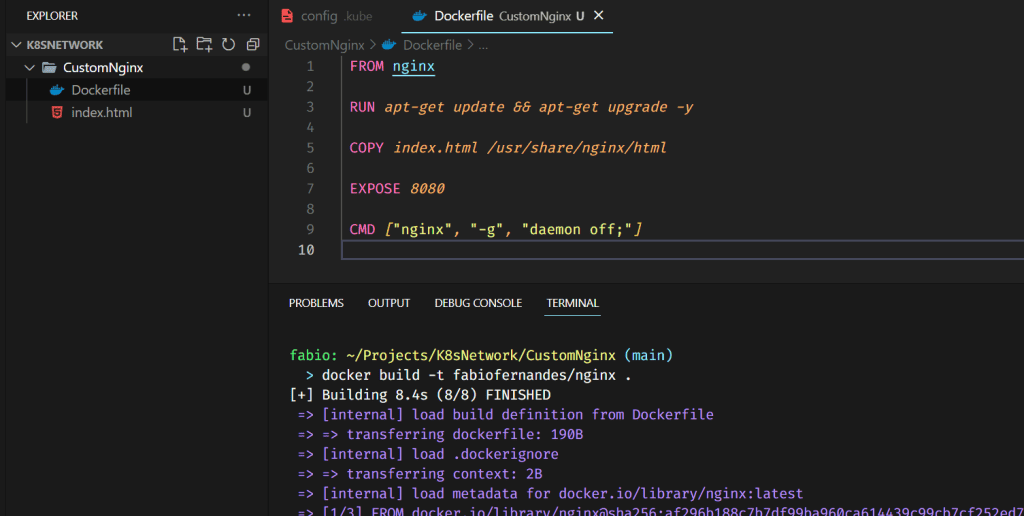
Remember to use your docker hub identification on the tag.
Then you only need to log in with the command Docker Login and push the image to the repository.
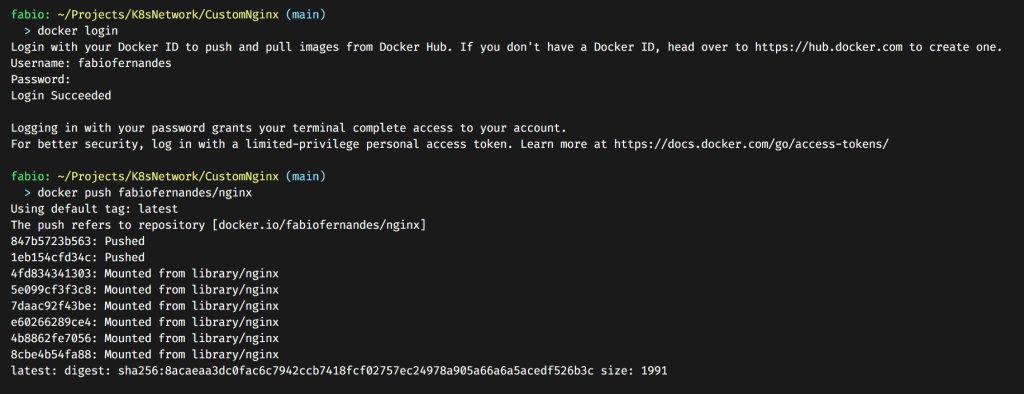
Now we can use this image in our Kubernetes resources.
Deploy a simple site in Kubernetes.
You probably already know how to do it, but we need something to demonstrate the different service types or ways to access the Kubernetes apps. So, let’s do that quick and simple.
I created a file with the namespace and deployment specs; by applying this file, we have the pods created and running.
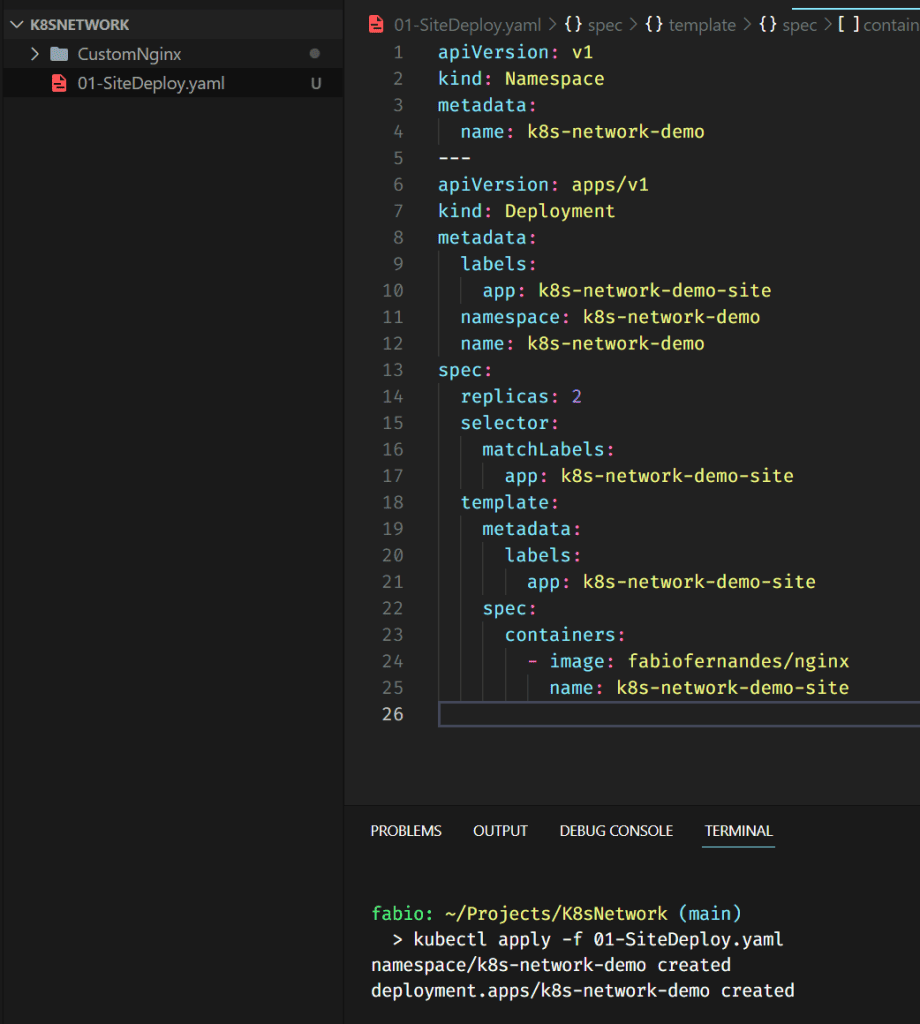
Nothing fancy here, a simple site based on my brand new image, published and running into two instances of our cluster.
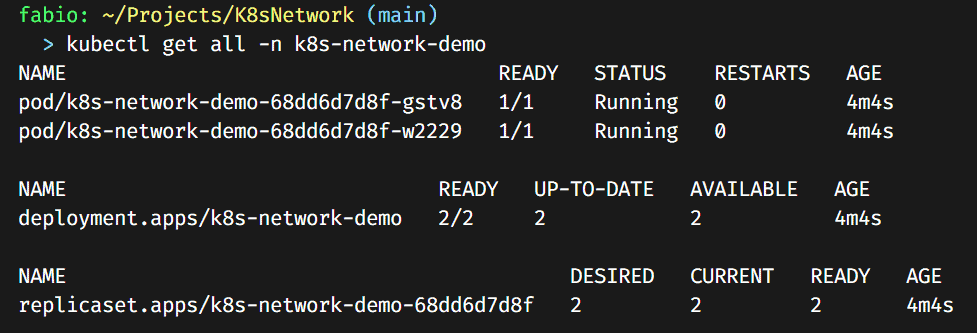
Everything is as expected; right now, the only way to see our page is to enter directly into one of the pods and browse the localhost there…
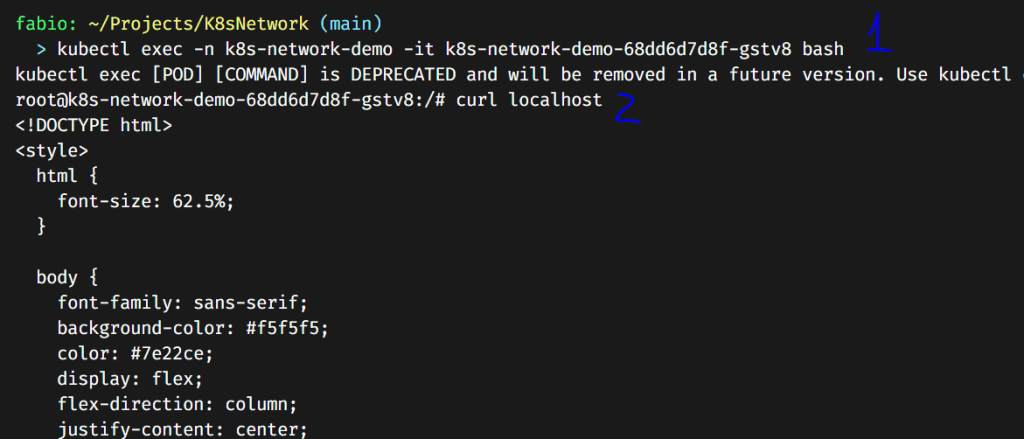
I entered the pod here and executed the curl command to check the localhost… We can see that the nginx is working correctly and serving our customized page. Now it’s only a matter of how to expose it.
Playing with services
Now that we already have our containers running and working, it’s time to expose it. The Kubernetes resource responsible for doing that is the service.
Let’s create a simple one and do some tests.
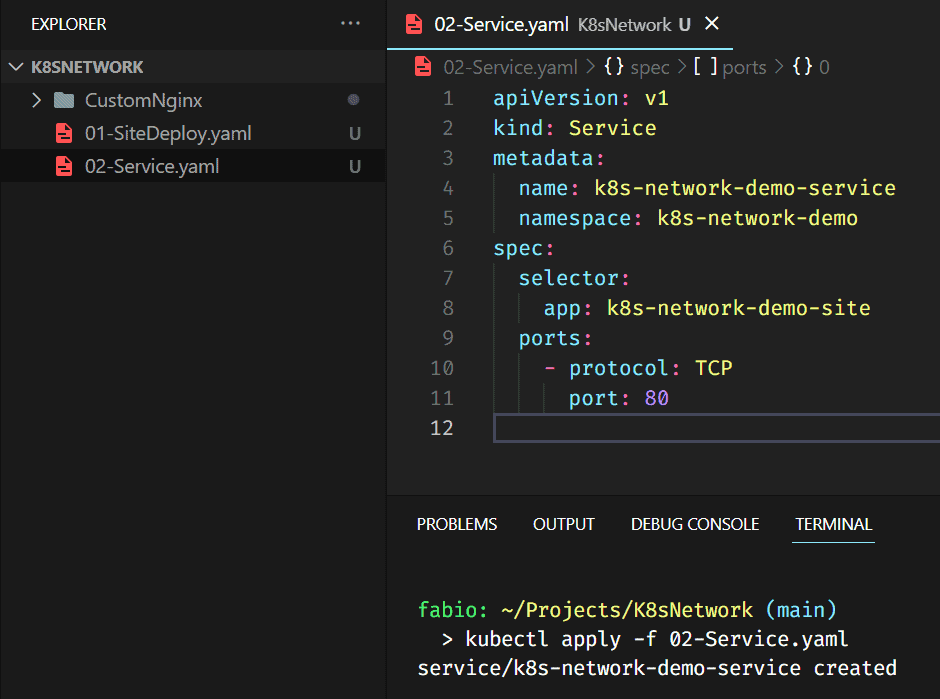
The most straightforward service we can create. We named it, put it under our namespace, and connected it with our containers using the selector, in this case, the app name.

Here is our service. What does it change? First of all, a simple load-balancer to our pods. Remember, we have two pods running our nginx application; the service will define to what pod redirects each request, balancing the workload into the pods.
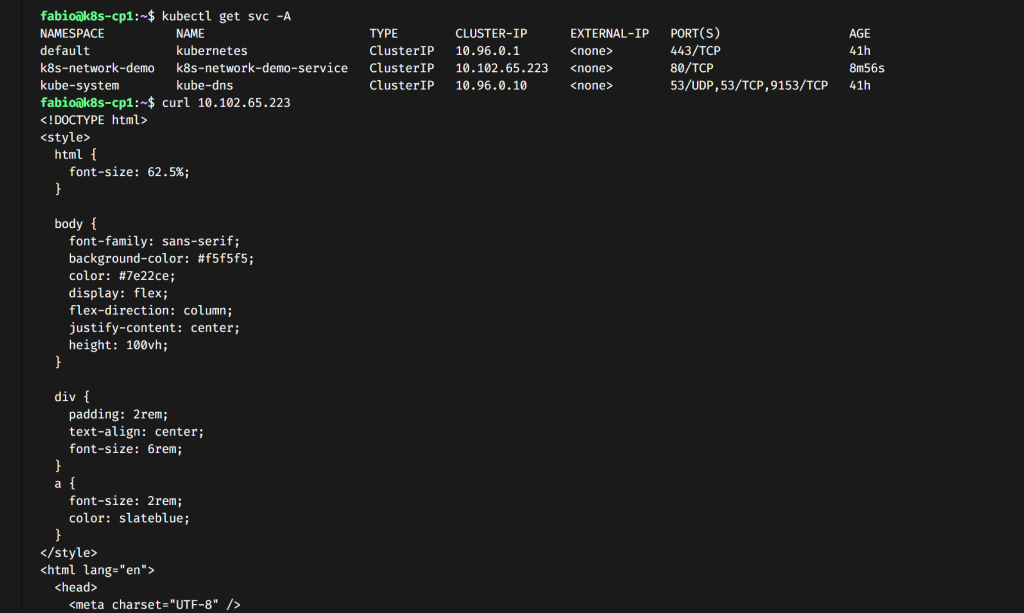
As you can see, it also created an IP inside the cluster. We can still not access this IP outside, but we already can inside the cluster. Imagine that you have another app that needs to use it. It’s already accessible to your app inside the cluster… Let’s check it.
Connect to any node of your cluster via ssh. Inside the cluster, run curl to the IP created for the service. You will see our page…
At this point, we can already do the port-forward trick…
kubectl port-forward service/k8s-network-demo-service 80:80 -n k8s-network-demo

Now you can understand a bit better the port-forward. We are telling to kubectl to expose a specific service to our local computer in a given port. As I said before, this is a temporary solution and should only be used to test or debug your application.
Changing the service type: NodePort and LoadBalance
Now let’s change our service to the NodePort type and check the differences.

The changes here are the type in the service specification and the nodePort/targetPort configuration.
So now, our service is listening on port 30001 on all our nodes and redirecting any request to any nodeIP+nodePort to our pods… Let’s test it…
Here we are; I used my node IP (inside my local network, remember?) with the port configured by the service, and the page is accessible.
Now what happens if we change the service to type LoadBalancer? Let’s try it out.
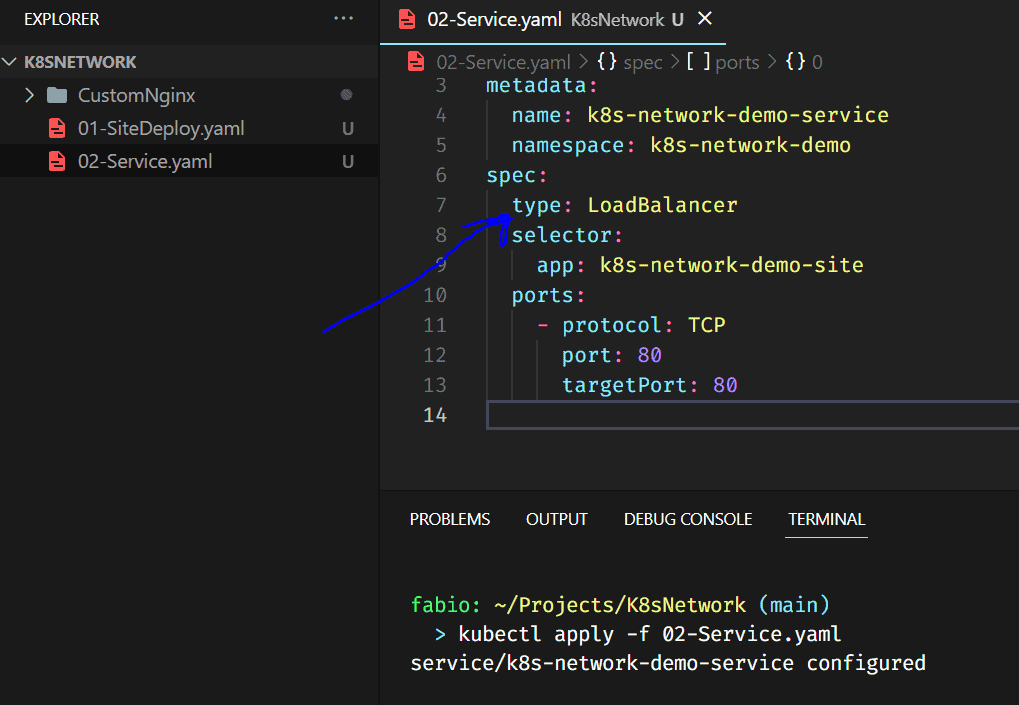

Look at that; we now have our external IP pending… Why? Because Kubernetes doesn’t have a built-in load-balancer function, we need to install and configure one by ourselves (If you are in a cloud environment, you don’t need to do it since they already have a load-balancer configured for you).
Let’s install one.
How to install MetalLB on the Kubernetes cluster?
Installing Metallb is easy; go directly to the official website (https://metallb.universe.tf/installation/) and run the latest manifest.
kubectl apply -f https://raw.githubusercontent.com/metallb/metallb/v0.13.10/config/manifests/metallb-native.yaml
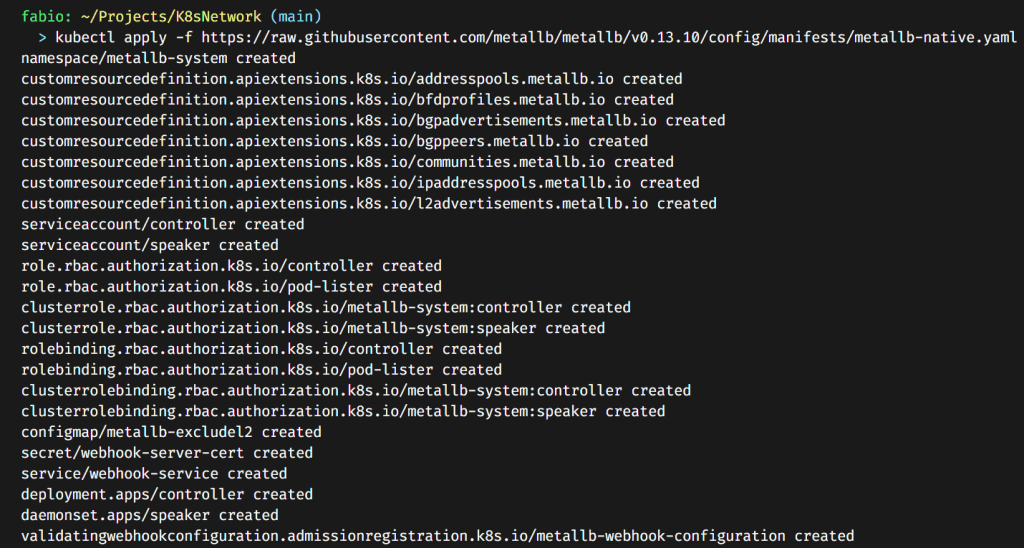
After running this command, you should see the pods running:

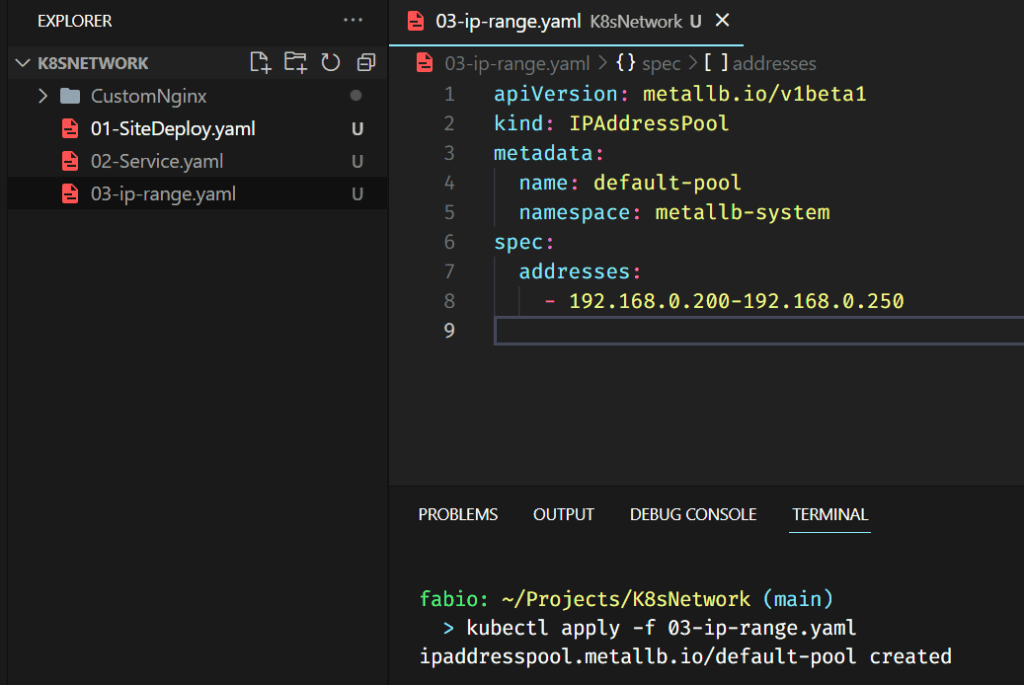
The load balancer is then correctly installed in our system, although we need an extra configuration. Remember when we talked about the network and how the load balancer work? It selects one valid IP from your local network and assigns it to the service. Well, the MetalLB doesn’t know what range of IPs we want it to use; we need to create a configuration file describing it.
Let’s create this file and execute it.
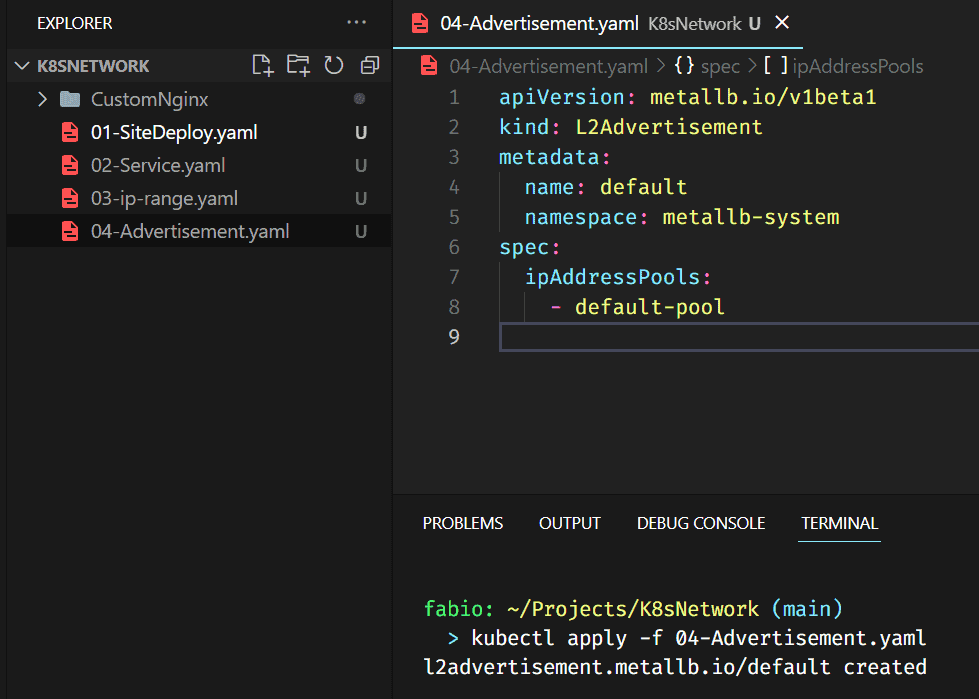
After configuring the IP Pool, we must set MetalLB to use it. There are different ways to do that; we will use the Layer 2 configuration (the simplest way to make it work).
Layer 2 mode does not require the IPs to be bound to the network interfaces of your worker nodes. It responds to ARP requests on your local network directly to give clients the machine’s MAC address.
To advertise the IP coming from an IPAddressPool, an L2Advertisement the instance must be associated to the IPAddressPool.
For more information about other configurations, check the official website: https://metallb.universe.tf/configuration/.
And that’s it, let’s check our service.

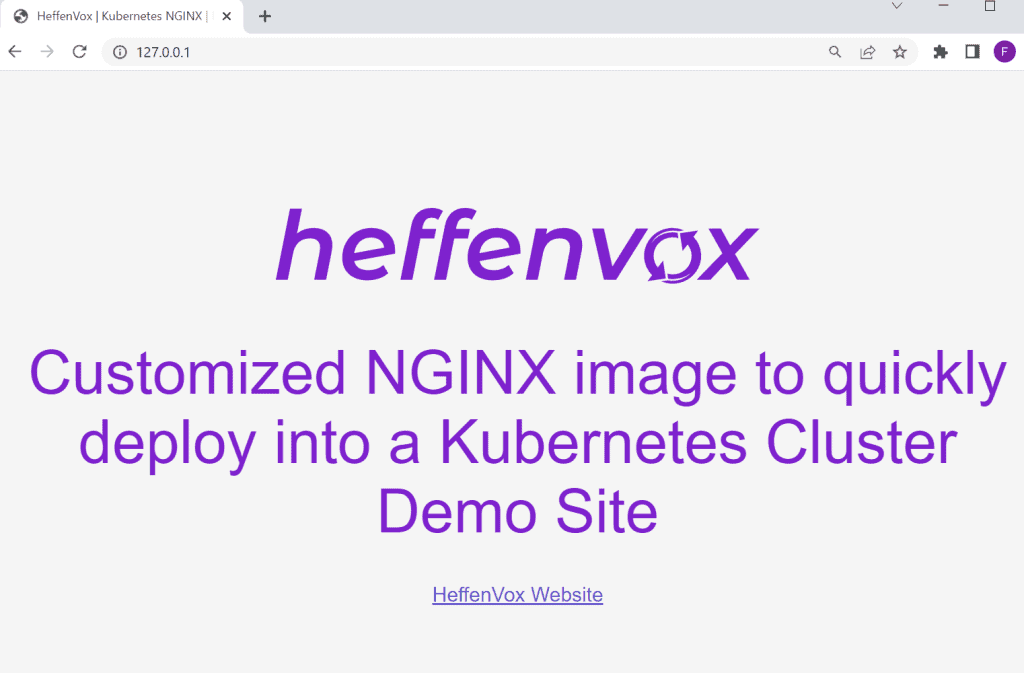
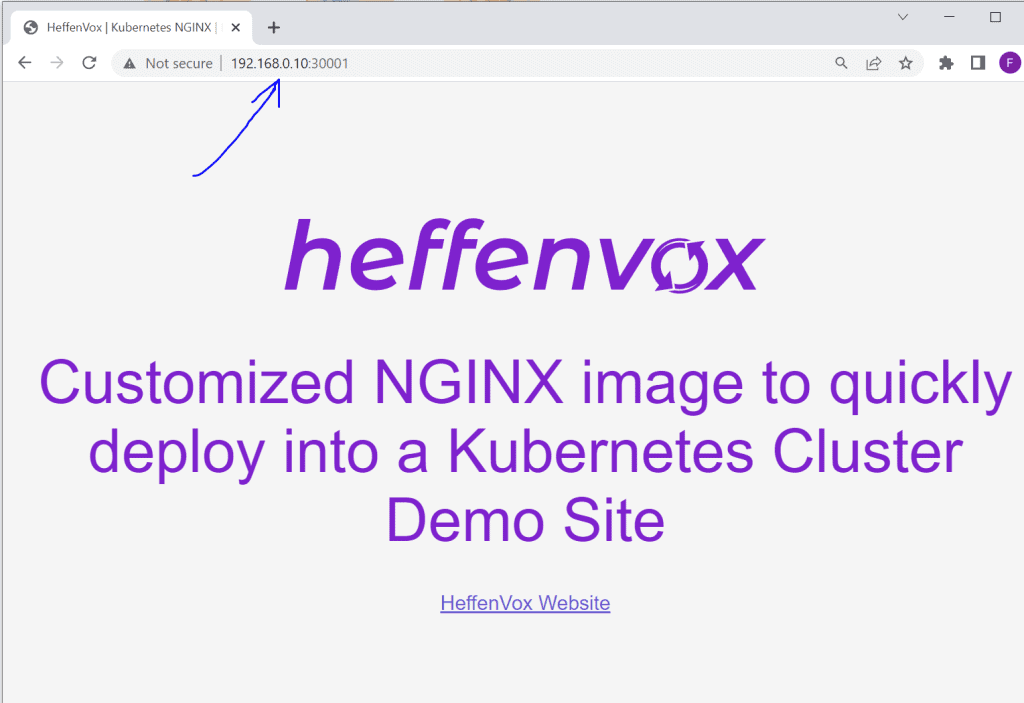
Look at that; our service already communicated with the load balancer that provides an IP to it… To ensure it works, let’s see if we can access this IP address from our browser.
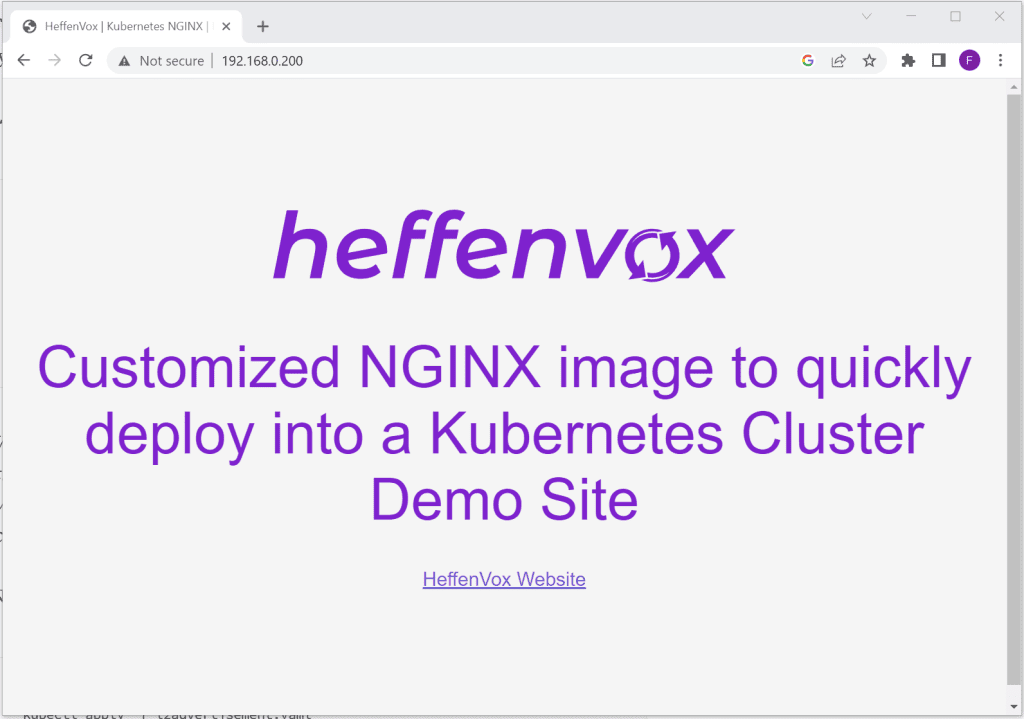
Here it is. cool right?
Conclusion
Hopefully, you now feel more confident in managing your applications on a Kubernetes cluster, have deepened your understanding of Kubernetes networking, and are equipped with the skills to optimize your K8s environment for your applications. As always, remember that mastering these skills requires consistent practice and continued learning. Happy K8s networking!