For a long time, I have worked with various techniques and tools for cost optimization and control. Each new implementation is another step towards better cost management in the cloud. We can start with the basics: using cloud providers’ tools and guides. Sometimes, I feel like I’m repeating myself in these articles. Still, these concepts are so important that I prefer to explain them multiple times to reinforce understanding and highlight their significance. If you’re already reading this article, chances are you don’t find the subject as boring as most people – at least, that’s my hope.
Welcome to the fascinating world of cloud cost optimization! In this journey, we’ll uncover practical tips to help you navigate the complexities of cloud spending and maximize your cost efficiency. Think of it as embarking on an epic quest armed with cost-monitoring tools, reserved instances, and the power of auto-scaling. It’s like wielding a lightsaber to slash through unnecessary expenses and harnessing the force of savings.
Let me lighten the atmosphere: Why did the developer go broke? Because he lost his domain in a bet with the Sith Lord of the server farm. Even Jedi-level coding skills couldn’t save him from the dark side of expenses *blink.
Now, let’s dive into cost monitoring, reserved instances, and auto-scaling to unlock the secrets of cost optimization in the cloud. May the savings be with you!
Enable Cost Monitoring and discovery of your challenges.
Think of cost monitoring as a financial dashboard for your cloud resources. Just as you track your expenses and budgets using a personal finance app, cost monitoring in the cloud console allows you to see how much you’re spending, set limits, and make informed decisions to optimize costs. It’s like having a clear view of your financial health and the ability to adjust your spending habits to save money.
If the step to enable cost monitoring does not exist or is not implemented, several challenges and potential consequences may arise:
- Lack of Visibility: Without cost monitoring, you won’t clearly understand how much you’re spending on cloud resources. This lack of visibility can lead to cost surprises, as you may not know the true extent of your expenses until you receive the bill.
- Overspending: Without monitoring, it becomes challenging to identify cost optimization opportunities. You may continue to allocate resources and use services without considering their impact on your budget. This can result in overspending, where you pay for resources or services that are underutilized or unnecessary.
- Difficulty in Budgeting: Setting and managing budgets becomes challenging without cost monitoring features. You won’t have a mechanism to define spending limits or receive notifications when costs exceed certain thresholds. This can lead to budget overruns, making it difficult to control expenses effectively.
- Inefficient Resource Allocation: Cost monitoring allows you to analyze resource usage and identify inefficiencies. Without it, you may struggle to allocate resources optimally, resulting in underutilized or overprovisioned instances. This not only wastes money but also hampers performance and scalability.
- Missed Cost Optimization Opportunities: Cost monitoring provides insights into usage patterns, enabling you to identify areas where cost optimization measures can be implemented. Without this visibility, you may miss opportunities to leverage discounted pricing models, adjust resource configurations, or explore more cost-effective alternatives.
- Inability to Track Cost Allocation: Cost monitoring features often include applying cost allocation tags, enabling you to categorize expenses by different dimensions, such as projects, teams, or departments. Without this functionality, it becomes challenging to attribute costs accurately and allocate them to the appropriate stakeholders or cost centers.
Cost monitoring within the cloud console is essential for effective cost management. This enables you to make data-driven decisions, optimize your cloud infrastructure, and allocate resources more efficiently, ultimately leading to significant cost savings and better financial control.
Steps to Enable Cost Monitoring in:
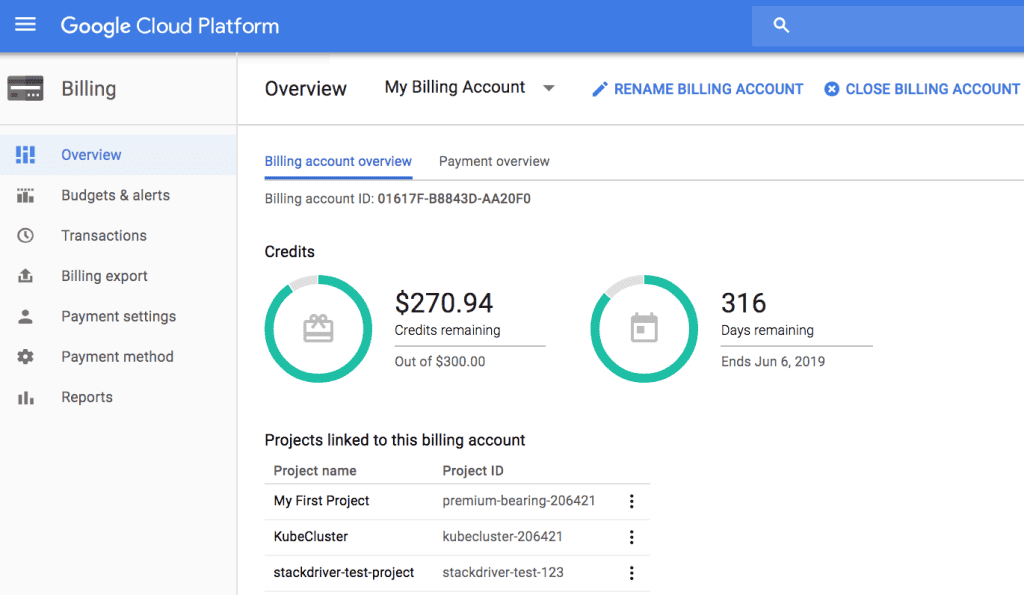
Google Cloud: You can enable cost monitoring by navigating to the “Billing” section in the Google Cloud Console. You can set up budgets, create alerts, and access detailed cost reports and dashboards from there. Google Cloud provides various cost analysis tools, such as Cost Explorer and Billing Catalog, which offer in-depth insights into your spending patterns and help you optimize costs effectively. You can access all Reports here.
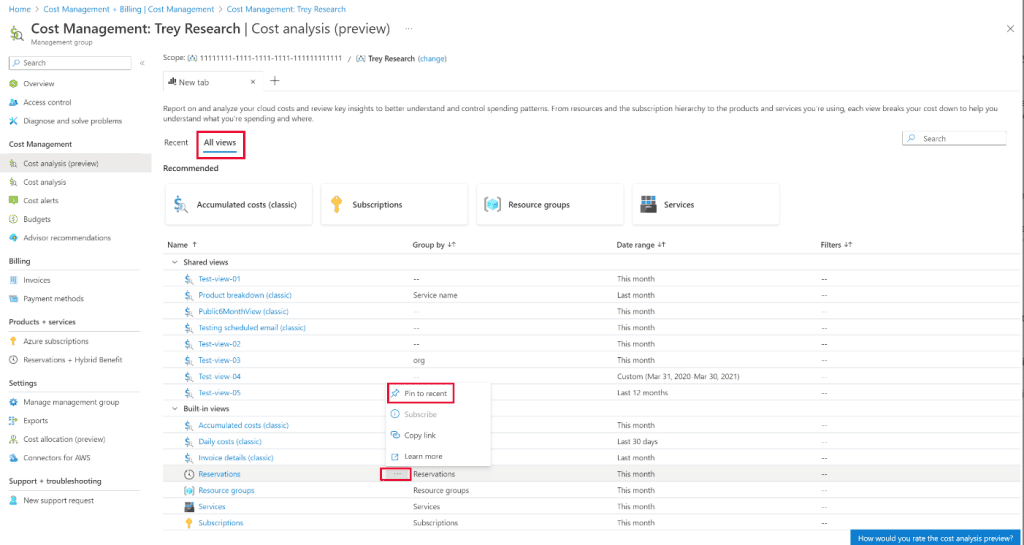
Microsoft Azure: To enable cost monitoring in Azure, go to the “Cost Management + Billing” section within the Azure portal. Azure offers robust cost management features, including budget creation, alerts, and analysis reports. You can leverage Azure Cost Management and Azure Advisor to gain visibility into your costs, optimize spending, and receive recommendations for cost-saving opportunities. You can get more information here.
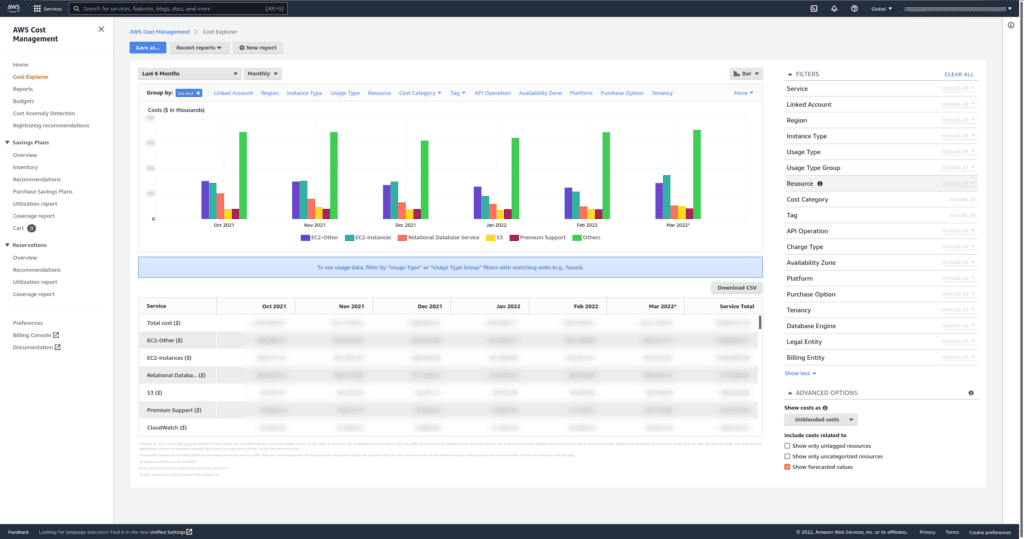
Amazon Web Services (AWS): You can enable cost monitoring through the AWS Management Console. AWS offers features like AWS Cost Explorer, AWS Budgets, and AWS Cost and Usage Reports to track and analyze your costs. You can set budgets, receive cost alerts, and access detailed reports to understand your spending patterns. Additionally, AWS Trusted Advisor provides cost optimization recommendations to help you make cost-efficient choices. More information here.
What If the data don’t make sense? Am I getting the real information?
Several configurations are typically necessary to see cost and usage information within cloud consoles, such as Google Cloud, Azure, and AWS. Here are some essential configurations:
Cost Allocation Tags: Setting up cost allocation tags is crucial for organizing and categorizing resources based on different dimensions, such as projects, teams, or departments. By assigning tags to resources, you can gain granular visibility into cost distribution and perform cost analysis in more detail.
Google Cloud
- Cost Allocation Tags:
- Open the Google Cloud Console.
- Go to the “Billing” section.
- If prompted, select the desired project.
- Click “Budgets & alerts” and then navigate to the “Budgets” tab.
- Under the budget settings, scroll down to the “Create a new budget” section.
- Enable the “Include credit data” option to ensure accurate cost allocation.
- Define your budget name, amount, and other settings.
- Click on the “Create” button to create the budget.
Azure
- Cost Allocation Tags:
- Open the Azure portal.
- Navigate to the “Cost Management + Billing” section.
- Select the desired subscription.
- In the left-hand menu, click on “Cost allocation.”
- Click on the “Tags” tab.
- Define your tags based on your chosen dimensions (e.g., project, team, department).
- Assign the relevant tags to your resources to categorize them accordingly.
AWS
- Cost Allocation Tags:
- Open the AWS Management Console.
- Navigate to the “Billing and Cost Management” section.
- Click on “Cost allocation tags.”
- Define your tags based on the desired dimensions (e.g., project, team, department).
- Assign the relevant tags to your resources to categorize them accordingly.
Billing and Usage Reports: Configuring billing and usage reports is essential to access detailed cost information within the console. These reports provide comprehensive data on resource consumption, cost breakdowns, and usage patterns. You can typically customize the reports to capture the specific details you need.
Budgets and Alerts: Setting up budgets within the console allows you to define spending limits and receive notifications when costs approach or exceed those limits. This configuration helps you proactively monitor and control expenses, ensuring you stay within your predefined budgetary constraints.
Google Cloud:
- Open the Google Cloud Console.
- Go to the “Billing” section.
- If prompted, select the desired project.
- Click on the “Budgets & Alerts” tab.
- Click on the “Create budget” button.
- Define the budget name, amount, and currency.
- Set the budget type (e.g., monthly, quarterly, annually).
- Specify the budget amount threshold and the desired notification threshold.
- Choose the notification settings, such as email recipients and frequency.
- Save the budget configuration.
Azure:
- Open the Azure portal.
- Navigate to the “Cost Management + Billing” section.
- Select the desired subscription.
- In the left-hand menu, click on “Cost Management.”
- Click on “Costs” or “Budgets,” depending on the portal version.
- Click on the “+ Add” or “Create budget” button.
- Enter the budget name and the desired amount.
- Choose the budget period (e.g., monthly, quarterly, annually).
- Set the desired notification threshold and frequency.
- Specify the notification recipients (email addresses).
- Save the budget configuration.
AWS:
- Open the AWS Management Console.
- Navigate to the “Billing and Cost Management” section.
- Click on “Budgets.”
- Click on the “+ Create budget” button.
- Select the desired budget type (e.g., Cost budget, Usage budget).
- Choose the budget period (e.g., monthly, quarterly, annually).
- Set the budget amount threshold.
- Configure the desired notification settings, such as email recipients and frequency.
- Save the budget configuration.
Integration with Third-Party Tools: Cloud consoles often offer integrations with third-party cost management and optimization tools. These tools can provide additional insights, recommendations, and automation capabilities to enhance cost visibility and control. Configuring integrations can offer more comprehensive cost management capabilities.
Resource Grouping and Filtering: Some cloud consoles allow you to group and filter resources based on specific criteria. For example, you can group resources by project, service, region, or other relevant dimension. This configuration helps you organize and navigate your resources effectively, making tracking costs associated with specific groups easier.
Google Cloud:
- Open the Google Cloud Console.
- Navigate to the “IAM & Admin” section.
- Click on “Resource Manager.”
- Select the desired project.
- Click on “Create a new organization.”
- Enter a name for the organization.
- Define the organization ID.
- Click on “Create” to create the organization.
- Once the organization is created, navigate to the “Resource Manager” page.
- Click on “Create a new folder” to create a folder.
- Enter a name and description for the folder.
- Choose the parent resource (organization or another folder).
- Click on “Create” to create the folder.
- Repeat the steps to create additional folders as needed.
Azure:
- Open the Azure portal.
- Navigate to the “Resource groups” section.
- Click on “+ Add.”
- Enter a name for the resource group.
- Choose the subscription under which the resource group will be created.
- Select the desired region for the resource group.
- Click on “Review + Create.”
- Review the configuration details and click “Create” to create the resource group.
- Repeat the steps to create additional resource groups as needed.
AWS:
- Open the AWS Management Console.
- Navigate to the “AWS Management Console” section.
- Click “Create resource group” or “Create a new resource group.”
- Enter a name for the resource group.
- Select the resources you want to include in the group using filters like tags, resource types, or regions.
- Review the resource group configuration.
- Click “Create resource group” or “Create” to create the resource group.
- Repeat the steps to create additional resource groups as needed.
Permissions and Access Control: It’s essential to configure permissions and access control within the console to ensure that only authorized individuals have access to cost information. Fine-grained access controls enable you to grant specific permissions for viewing and managing cost-related data, ensuring data security and privacy.
By configuring these elements, such as cost allocation tags, billing and usage reports, budgets, cost management dashboards, and integrations, you can unlock comprehensive cost visibility and analysis capabilities within the cloud console. These configurations enable you to monitor, manage, and optimize costs effectively, making informed decisions and maximizing cost efficiency.
Reserved Instances or Savings Plans
Purchasing reserved instances or savings plans is like buying a subscription or a membership for your favorite gym or fitness center. When you commit to a long-term membership, you typically receive significant discounts compared to paying for individual visits. Similarly, by identifying workload patterns or services with consistent usage and purchasing reserved instances or savings plans in the cloud, you can enjoy substantial cost savings on your long-term commitments, reducing your overall cloud costs.
Paragraph on Why and Benefits: Reserved Instances or Savings Plans offer compelling benefits for optimizing cloud costs. You can achieve significant cost savings when you identify workload patterns or services with predictable usage, such as databases, production environments, or steady workloads, and purchase reserved instances or savings plans. Committing to a long-term contract offers you discounted pricing compared to on-demand or pay-as-you-go models. This enables you to reduce overall costs and improve cost predictability, as the discounted rate remains stable over the reserved duration. Moreover, reserved instances or savings plans provide budgetary control by allowing you to plan and allocate your cloud spending more efficiently. They also ensure resource availability, as you have reserved capacity specifically allocated to your workloads, eliminating the risk of capacity constraints during peak demand periods. Overall, reserved instances or savings plans empower organizations to optimize their cloud costs, drive cost efficiencies, and allocate resources effectively based on workload patterns and consistent usage.
Google Cloud:
- Open the Google Cloud Console.
- Navigate to the “Compute Engine” section.
- Click on “VM instances” or “Instance groups,” depending on your use case.
- Identify the workload patterns or services that have consistent usage and would benefit from reserved instances.
- Determine the reserved instances’ desired configuration (e.g., instance type, region, operating system).
- Navigate to the “Reservations” section.
- Click on “Create a reservation” or “Create a commitment,” depending on the service.
- Select the appropriate reservation type (e.g., VM instance, SQL database).
- Specify the reservation details, including the instance configuration and duration (e.g., one year, 3 years).
- Review the cost and discount information.
- Click on “Create” to purchase the reserved instances.
Azure:
- Open the Azure portal.
- Navigate to the desired resource or service you want to purchase reserved instances for (e.g., Virtual Machines, Azure SQL Database).
- Click on “Reserved Instances” or “Reserved Capacity,” depending on the service.
- Review the available options and discounts for reserved instances.
- Select the reserved instances’ desired configuration (e.g., region, instance type).
- Specify the reservation’s quantity and duration (e.g., one year, three years).
- Review the cost and savings details.
- Click on “Purchase” or “Buy now” to complete the purchase of reserved instances.
AWS:
- Open the AWS Management Console.
- Navigate to the desired service or resource you want to purchase reserved instances (e.g., EC2 instances, RDS databases).
- Click on “Reserved Instances” or “Reserved Capacity,” depending on the service.
- Review the available options and discounts for reserved instances.
- Select the reserved instances’ desired configuration (e.g., instance type, region).
- Choose the reservation term (e.g., one year, three years) and payment option (All Upfront, Partial Upfront, No Upfront).
- Specify the number of reserved instances you want to purchase.
- Review the cost and savings information.
- Click on “Purchase” or “Buy now” to complete the purchase of reserved instances.
By following these steps, you can identify workload patterns or services that have consistent usage and purchase reserved instances or savings plans in Google Cloud, Azure, and AWS. These options provide significant cost savings through long-term commitments, allowing you to reduce overall costs for your cloud infrastructure.
Defining the best savings plans involves carefully analyzing and considering your workload patterns, usage, and long-term goals. Here are some steps to help you determine the best savings plans:
- Workload Assessment: Evaluate your workload patterns and usage to identify which services or resources have consistent and predictable utilization. This could include services like virtual machines, databases, or storage that are consistently in use.
- Usage Analysis: Analyze historical usage data to understand your workloads’ frequency, duration, and intensity. Look for patterns and trends that indicate stable usage over time.
- Cost Analysis: Calculate the costs of your workloads under different pricing models, such as on-demand, reserved instances, or savings plans. Compare the potential savings and cost reductions offered by each option.
- Commitment Period: Determine the appropriate commitment period based on your workload stability and business requirements. Savings plans typically offer longer-term commitments, such as one or three years, while reserved instances may have shorter-term options.
- Instance Flexibility: Consider the flexibility requirements of your workloads. Some savings plans or reserved instances may provide flexibility regarding instance size, family, or operating system. Evaluate whether the available options align with your workload’s technical specifications.
- Vendor Comparison: If using a multi-cloud approach, compare the savings plan or reserved instance offerings across different cloud service providers. Assess each vendor’s discounts, flexibility, and coverage options to make an informed decision.
By configuring these elements, such as cost allocation tags, billing and usage reports, budgets, cost management dashboards, and integrations, you can unlock comprehensive cost visibility and analysis capabilities within the cloud console. These configurations enable you to monitor, manage, and optimize costs effectively, making informed decisions and maximizing cost efficiency.
Can sometimes Auto-Scaling be an “auto waste of resources”?
Auto-scaling is like having a smart thermostat for your home’s heating and cooling system. Just as a smart thermostat adjusts the temperature automatically based on your comfort needs, auto-scaling adjusts the capacity of your resources in the cloud based on workload demands. It ensures that you have the right resources available when needed, avoiding the wastefulness of overprovisioning and the risk of insufficient capacity during peak periods.
Implementing auto-scaling for your resources offers numerous benefits and cost-saving advantages. With auto-scaling, you can optimize resource allocation based on the varying demands of your workloads. During high traffic or increased demand, it automatically adds more resources, such as virtual machines or containers, to handle the workload efficiently. Conversely, during periods of low activity, auto-scaling reduces resources to avoid overprovisioning and unnecessary costs. This elasticity enables you to match your resource capacity precisely to the workload demands, ensuring optimal performance and cost efficiency. Auto-scaling also improves application availability and reliability by automatically replacing failed instances and maintaining consistent performance. Moreover, auto-scaling reduces manual intervention and monitoring, allowing your team to focus on higher-value tasks instead of continuously adjusting resource capacity.
To avoid auto-scaling becoming an “auto waste of resources,” it’s important to implement it thoughtfully and consider the following best practices:
- Set Appropriate Metrics and Thresholds: Choose the right metrics and threshold values for scaling decisions. Utilize metrics that accurately reflect the workload demands, such as CPU utilization, network traffic, or request latency. Set thresholds that trigger scaling actions only when necessary, preventing unnecessary scaling in response to minor fluctuations.
- Monitor and Fine-Tune Scaling Policies: Regularly monitor the performance and effectiveness of your auto-scaling policies. Analyze how well they align with actual workload patterns and adjust as needed. Consider historical data, seasonality, and anticipated traffic patterns to fine-tune the scaling policies for optimal resource allocation.
- Use Predictive Scaling: Some cloud providers offer predictive scaling, which uses machine learning algorithms to forecast resource needs based on historical data. Predictive scaling can help anticipate demand and proactively adjust resource capacity, reducing the chances of unnecessary scaling and optimizing resource allocation.
- Implement cooldown Periods: Apply cooldown periods to prevent rapid and frequent scaling actions. A cooldown period is a time interval during which auto-scaling is temporarily disabled after a scaling event. This helps stabilize resource capacity and avoids unnecessary scaling actions triggered by short-lived workload spikes or fluctuations.
- Use Mixed Instance Types or Spot Instances: Consider using mixed instance types or spot instances in your auto-scaling groups. Mixed instance types allow you to diversify your instance fleet, optimizing cost and performance. Spot instances provide significant cost savings, allowing you to take advantage of unused capacity in the cloud. However, consider workload suitability and availability when using spot instances.
- Continuous Monitoring and Optimization: Regularly monitor and analyze your application’s performance, resource utilization, and cost patterns. Identify opportunities for optimization, such as rightsizing instances, optimizing code and configurations, and using caching mechanisms. Optimizing your application and infrastructure can reduce resource requirements and avoid unnecessary scaling.
- Load Testing and Capacity Planning: Conduct thorough load testing and capacity planning exercises to understand your application’s performance characteristics and resource needs. By simulating various workload scenarios, you can determine the optimal resource capacity and scaling thresholds, ensuring that auto-scaling is aligned with your application’s requirements.
By following these best practices, you can ensure that auto-scaling is used efficiently and avoids unnecessary waste of resources. Careful monitoring, optimization, and adjusting scaling policies based on workload patterns will help you balance resource availability and cost optimization.
Overall, auto-scaling enables you to optimize cost, maximize resource utilization, and ensure a seamless user experience by dynamically adjusting resource capacity based on workload demands.
Google Cloud:
- Open the Google Cloud Console.
- Navigate to the desired resource or service that you want to apply auto-scaling to (e.g., Compute Engine, App Engine, Kubernetes Engine).
- Configure the resource to enable auto-scaling. The specific steps may vary depending on the service but typically involve:
- Selecting the resource group or instance group.
- Defining the minimum and maximum number of instances to scale.
- We are setting the scaling policy based on CPU utilization, HTTP traffic, or custom metrics.
- Configuring the desired scaling behavior, such as adding or removing instances based on the workload demands.
- Save the auto-scaling configuration.
Azure:
- Open the Azure portal.
- Navigate to the desired resource or service to apply auto-scaling (e.g., Virtual Machines, App Services, Virtual Machine Scale Sets).
- Configure the resource to enable auto-scaling. The specific steps may vary depending on the service but typically involve:
- Selecting the resource group or resource.
- Defining the scaling rules based on CPU usage, network traffic, or custom metrics.
- We are setting the desired scaling behavior based on workload demands, such as scaling out (increasing instances) or scaling in (decreasing instances).
- Save the auto-scaling configuration.
AWS:
- Open the AWS Management Console.
- Navigate to the desired resource or service to apply auto-scaling (e.g., EC2 instances, ECS services, DynamoDB tables).
- Configure the resource to enable auto-scaling. The specific steps may vary depending on the service but typically involve:
- We are creating an auto-scaling group or configuring an existing one.
- Defining the desired scaling policies based on CPU utilization, request count, or custom metrics.
- Setting the minimum and maximum number of instances to scale.
- Configuring the desired scaling behavior, such as adding or removing instances based on workload demands.
- Save the auto-scaling configuration.
Following these steps, you can implement auto-scaling in Google Cloud, Azure, and AWS for various resources and services. Auto-scaling dynamically adjusts resource capacity based on workload demands, ensuring you have the right amount of resources available when needed and avoiding unnecessary costs associated with overprovisioning.
Stay tuned for Part 2
In conclusion, dear patient reader, optimizing costs in the cloud is like embarking on an epic quest in a vast and ever-expanding universe. Just as skilled gamer hones their strategies, refines their skills, and explores new realms, we too can navigate the intricate world of cost optimization with the right tools and knowledge.
But our adventure doesn’t end here. The journey continues into Part 2, where we delve deeper into spot instances and preemptible VMs, data transfer optimization, storage optimization, service cost analysis, and the wonders of third-party tools. It’s time to level up your cost optimization game and uncover new ways to save resources and unlock hidden treasures of efficiency.
So, grab your virtual sword and shield, prepare your spells of cost management, and join us in the next installment of this nerdy odyssey. Together, we’ll conquer the challenges of cloud costs and emerge as savvy cost optimization heroes!
See ya, Cost optimizers!
o/